Post Flight 5 Maintenence

Disconnected the hoses and unscrewed the elbow fittings from two master cylinders (lower fittings on pilot & passenger right brake pedals). Resealed 2 brake pedal NPT fittings using permatex #2 and reconnected the Bonaco hose fittings.

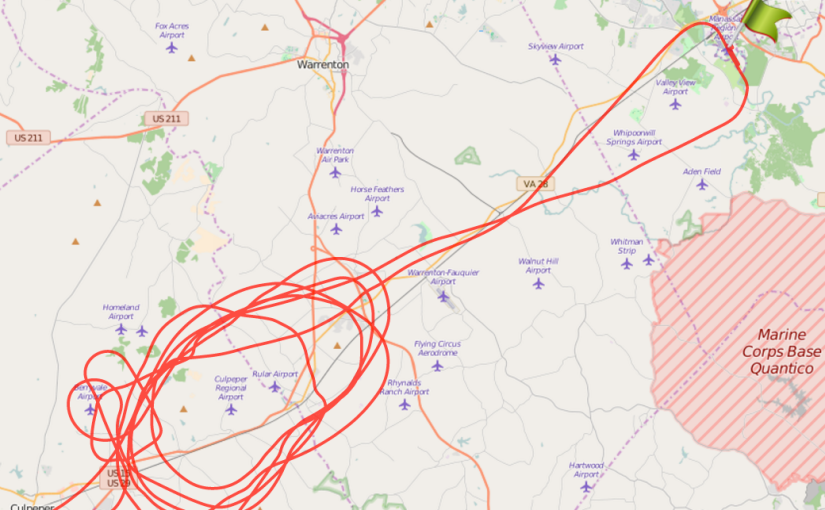
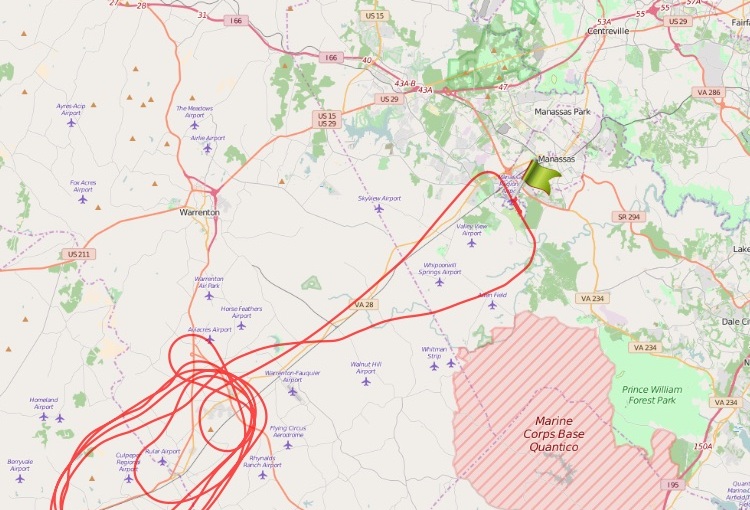
Bled the right side brake (for probably the 5th time).

Removed the upper cowl.

Removed the lower cowl.

Trimmed metal flange on left side of starter ring gear to make getting the lower cowl on and off easier.

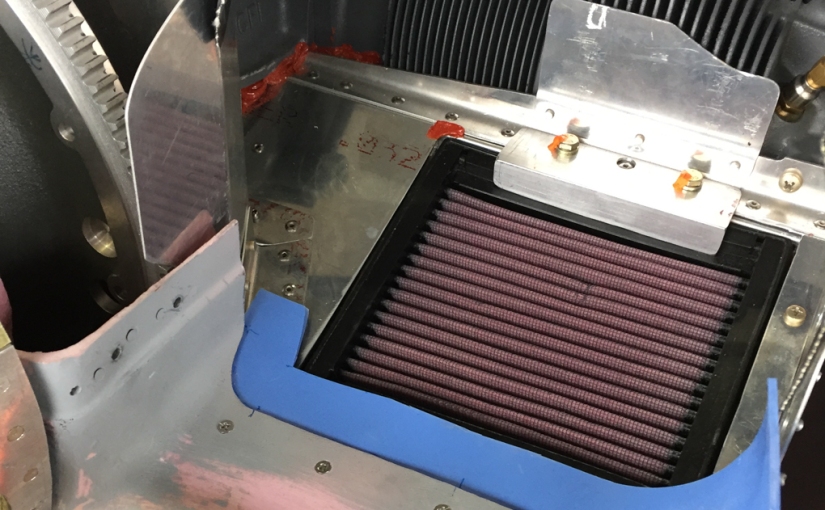
Installed cowl inlet baffle seals on the lower cowl lips using #6 countersunk screws and all metal locknuts and washers. I used 3/32 blue silicone for the first time from Aircraft Spruce.

Front left lower cowl air inlet baffle seal:IMG_0580

Front right lower cowl air inlet baffle sealIMG_0583

New piece of black baffle material added at the front on both sides like this one on the left:IMG_0582

Found an area on the lower cowl in front of the nose gear leg that is obviously letting a bunch of pressurized air into the lower cowl area. This is probably reducing cooling of the CHTs to some extent. I will try covering this hole on the next flight. It eventually will get covered by the nose gear fairing upper intersection fairing (but I haven’t made that yet).

Flight #5

Pre-flight prep work: Dave Haschart met me at the hanger at 07:00 and helped with preflight; Thanks Dave! Removed upper & lower cowl, inspect FWF. New heat scat tube mounting looks to be doing well. Reinstalled upper & lower cowl. Attached tape to front cowl noses to see if it helps with not pressurizing the lower cowl area and improves CHTs. Also added tape to block 1/4 of the oil cooler. Tire pressures: L: 32.0, R:31.5, N:31.0. Preflight inspection completed.

I flew four laps around the pattern and performed 3 landings with 15 degrees flap and 1 landing with 30 degrees flap. This plane lands beautifully. I haven’t had a bad landing yet or even so much as a hop/skip, but I’m sure they are coming. The winds have always been calm so far. My takeoffs / go arounds however still leave much to be desired. I haven’t mastered keeping the nose wheel off the ground but not WAY off the ground. Thus when I accelerate on the go after a landing, I either lift off early or let the nose wheel touch. I’m trying to work on getting the hang of the right amount of stick back pressure.

After the 4th landing, when retracting the flaps, I got a red flap fault warning. I taxied back to the hangar to check things out. After shutdown, I reset the flap fault on the VPX (it was a flap runaway; which means the flap motor ran longer than it was supposed to). Turns out it was the up limit on the flap sensor that wasn’t being met, and the flaps kept running when I retracted them. This was the same condition that Mark Gramann noticed on the flap down side, which I corrected earlier by adjusting the down flap limit. It looks like I will need to adjust the up flap endpoint also. I should use this as an opportunity to check that the installation of the flap sensor is not shifting and to permanently install the pop rivets holding the flap sensor.

Flight Data

Flight Map

Post flight 5: Found overflowed brake fluid around the firewall reservoir (will continue to watch this and see if it stops when the reservoir is 1/2 full). Also found some weeping brake fluid connections on the pilot and passenger right brake pedal master cylinder lower connections. I don’t have the best luck with NPT fittings I guess. I have used Locktite 567 when screwing the 90 degree elbows into the gold brake pedal master cylinders, but was afraid of turning them in too hard and probably undershot. I plan to tighten these two fittings and apply Locktite 567 again. Unfortunately, I will have to bleed at least the right side brakes again.

Engine Total Time 6.3, Total Time 7.5, This flight: 0.5/0.7. Oil was at 6.0 quarts (hot). Left tank dipstick was at 16.5, and fuel totalizer said 3.7 used, but I did not fuel or reset totalizer after this flight.

12/13/15: Riveted flap sensor in place. Adjusted the flap up and down stops to be 8 units backed off from actual end points. Adjusted the flaps to run for 0.2 seconds after reaching the backed off stops. This should ensure the stops get triggered and the flaps stop running after an additional 0.2 seconds. Prior to last flight I reversed this roll trim end points so the indicator was indicating properly, but since I didn’t reverse the motor polarity, now the trim indication was moving in the opposite direction of the hat switch. I reversed the motor polarity after this flight, and now finally I think the trim will be running in the correct direction. I also added new baffling extending forward a few more inches on cylinder #1 and #2 towards the top cowl front.

Flight #4

The fourth flight on Sunday was similar to flight #3. The goals were to perform full flap testing, and begin stall testing. Prior flights had only used 15 degrees of the 45 available flap degrees. I have flap stops set at 0, 15, 30, and 45 degrees.

Flap testing was uneventful and the flaps perform as expected. Later flights will determine stall speeds at all flap settings. There is considerable pitch down moment when the flaps are deployed and there is considerable sink when retracting the flaps in one continuous motion.

I climbed to ~7,500 feet MSL and performed several approach to stalls with the aircraft in a clean configuration. Post flight examination of the data shows 56.2 KIAS did not stall, but 55.5 KIAS did stall (3rd dip in plot below). Later in the flight I climbed to 10,000 feet MSL.

Screen Shot 2015-12-07 at 6.47.33 PM

During flight the seatbelt shoulder harness adjustment was causing the left shoulder belt to get caught on the right side of the seat headrest whenever I leaned to the right. This was annoying so I adjusted it on the ground after flight to prevent this in the future.

Flight #4 Map

Flight #4 Data

Post flight observations:

Right tank dipstick = 8 gallons remaining

Left tank dipstick = 13 gallons remaining

Gauge: L=15, R=12

Totalizer: 18.8 used, 22.2 remaining (41 start)

Engine Time = 1.6, Engine Total Time = 5.8

Time This Flight = 1.7, Total Time = 6.8

Oil = 6.0 Quarts (hot)

Fuel Truck Fill: L = 11.5, Dipstick = 19.5

Fuel Truck Fill: R = 6.7, Dipstick = 20.0

Removed top cowl

Removed wing root fairings (top side only) to inspect the fuel tank inboard ends for any signs of fuel leaking (found none). There was a lot of little dust and debris that had migrated to this location after these first few flights so I vacuumed that out. Expect this came from the wing internals and from under the seat floor pans.

Need to update the checklist to include flaps up after landing, flaps down before shutdown, record flight times before shutdown.

Need to buy and instrument cover for the area behind the instrument panel.

Flight #3

The morning flight went so well, that I decided to do an afternoon flight by myself after the ground crew had gone home.

The purpose of this flight was continued break-in of the engine, and departing the local Manassas class D airspace to get outside the SFRA. This enabled me to get some altitude under the wings, and gave me some added gliding distance if anything unusual happened with the engine.

I filed for departure at 18:15 and return at 19:15. I left Manassas and was over Warrenton in only 5 minutes. Amazing how fast things happen at 160 KTAS.

Outside the class D and SFRA, I climbed to ~6500-7000 feet MSL and just did laps around Warrenton & Culpeper keeping the two airports within several miles.

Flight #3 Data

Flight #3 Map

Post flight observations:

Good CHTs in Cruise…the engine seems to be slowly cooling off this flight even though I constantly increased the RPM throughout the flight.

Oil Temps are maxing out around 178F which is a bit too low…I may try to cover 1/3 of the oil cooler air inlet which may also help with more air for cooling the CHTs.

I noticed some grease being thrown from both main gear wheel bearings and some from the nose gear wheel bearing. The nose gear seems to grab/release when pushing the plane backwards. I will have to watch this and plan to upgrade the nose gear bearing per some of the links on VAF soon.

The prop threw a little grease from the prop hub. This is normal for the first 10 hours, I understand.

This flight started with 41 gallons on board, but the fuel totalizer started at 40 gallons I think.

Right tank dipstick measurement post flight: 13 gallons remaining

Left tank dipstick measurement post flight: 13 gallons remaining

Gauges say 15 + 15 remaining

Totalizer says 15.9 gallons used (24.1 remaining)

Oil is 6.0 to 6.1 quarts remaining

Add to the todo list: print new checklist, add switch tanks to checklist, tape front right cowl gap to see if it helps with cooling.

Fuel truck added 7.3 gallons to each tank (14.6 gallons vs 15.9 on totalizer).

Flight #2

Once again I had a nice group of friends willing to support this flight by acting as ground crew. Dave, Alex, & Lisa Haschart, and Bruce Anderson, joined Rachel, Zack, Mom and me at the airport at 7AM on Saturday.

We didn’t have the fire axe or rescue squad folks on hand for this one so we were missing the fire axe and sawzall, but felt comfortable proceeding based on the success of the first flight.

Once again, flight #2 was to be a trip around the local airport pattern at Manasssas VA. However, this time I was flying ~155 KIAS instead of the ~105 KIAS from first flight.

Departure was around 07:45. Tower had me make left traffic from runway 34R which was a bit unusual, but posed no problems and let me fly larger laps around the west side of the airfield. I spent about 1:30 in the air.

Dave was kind enough to send me this video of the takeoff:

This flight included a fuel tank change every 30 minutes, and I started on the left tank which had been tested during the first flight. No noticeable effects in fuel pressure or fuel flow when changing tanks for the first time. I did not use the boost pump during switches.

Dave also sent this video of the taxi in after landing:

After taxi in and de-cowling, we checked/noticed the following items:

Brakes were good but reservoir leaked another ~1oz.

Right Tank Dipstick Measurement: 12 Gallons Remaining (Gauge = 14 gals)

Left Tank Dipstick Measurement: 7 gallons remaining (Gauge = 8 gals)

Oil: 6.1 Quarts

Fuel Flow Totalizer: Fuel Remaining = 16.5 gallons

Fuel Used = 22.5 gallons

Fuel Truck Filling: 23.2 Gallons Added

Right Tank Dipstick = 20.5 Gallons

Left Tank Dipstick = 20.5 Gallons

Wiped brake reservoir but didn’t tighten or fill.

Pulled cowls and checked engine compartment. Added foil tape to bottom of heat scat tube where rubbing cowl. Still need permanent fix.

Flight Temps & Parameters: Flight 2 Data

Flight Map: Flight 2 Map


Flight #2 Prep Work

Today I installed the GoPro camera via a suction cup mount hanging from the canopy ceiling on the passenger side. I did not yet hook up the audio/power cable as I don’t have a skeleton case that allows the mount and the cables at the same time.

I checked the oil and measured 6.25 quarts (cold). I noticed minor rubbing between the lower cowl and the heater scat tubes that will need fixing eventually.

I opened the right dash panel to access the IFR GPS (GTN650) antenna cable which had become loose (I think I didn’t screw it in fully originally). This is a type-N or similar connector that screws several turns. I applied a bit of extra torque using a wrench. I checked the IFR GPS and am now getting satellite reception again.

I looked for brake fluid leaks around the right wheel and found none from the brake bleeding #3 yesterday.

I mounted the lower cowl and the upper cowl. I reinstalled the cowl hinge pins (2 side vertical, 2 side horizontal, 2 upper rear, and 2 lower) & 6 retainer screws. I reinstalled the lower cowl retainer plate, 2 washers, and two screws.

Bleeding the brakes again (3rd time)

After my first flight, I noticed the brakes were spongier than before. After de-cowling after the first flight, I found that when I had bled the brakes the 2nd time, I hadn’t gotten the cap on the brake reservoir on the firewall tightened securely enough. During the first flight, some of the brake fluid  (~1 oz) had overflowed the master reservoir and coated the firewall.

Today I attempted to bleed the brakes for a third time (to git rid of the air bubble sponginess I had introduced when bleeding the brakes a 2nd time (to fix the right brake leak). I got several noticeable bubbles out of the master reservoir by bleeding the right brake, and made sure I tightened the cap on the reservoir securely this time.

After standing on the brake pedals on both passenger and pilot sides, it feels like they are once again firm (like they were after the first brake bleeding with Steven). I will check their performance on the 2nd flight, probably this coming Saturday morning.