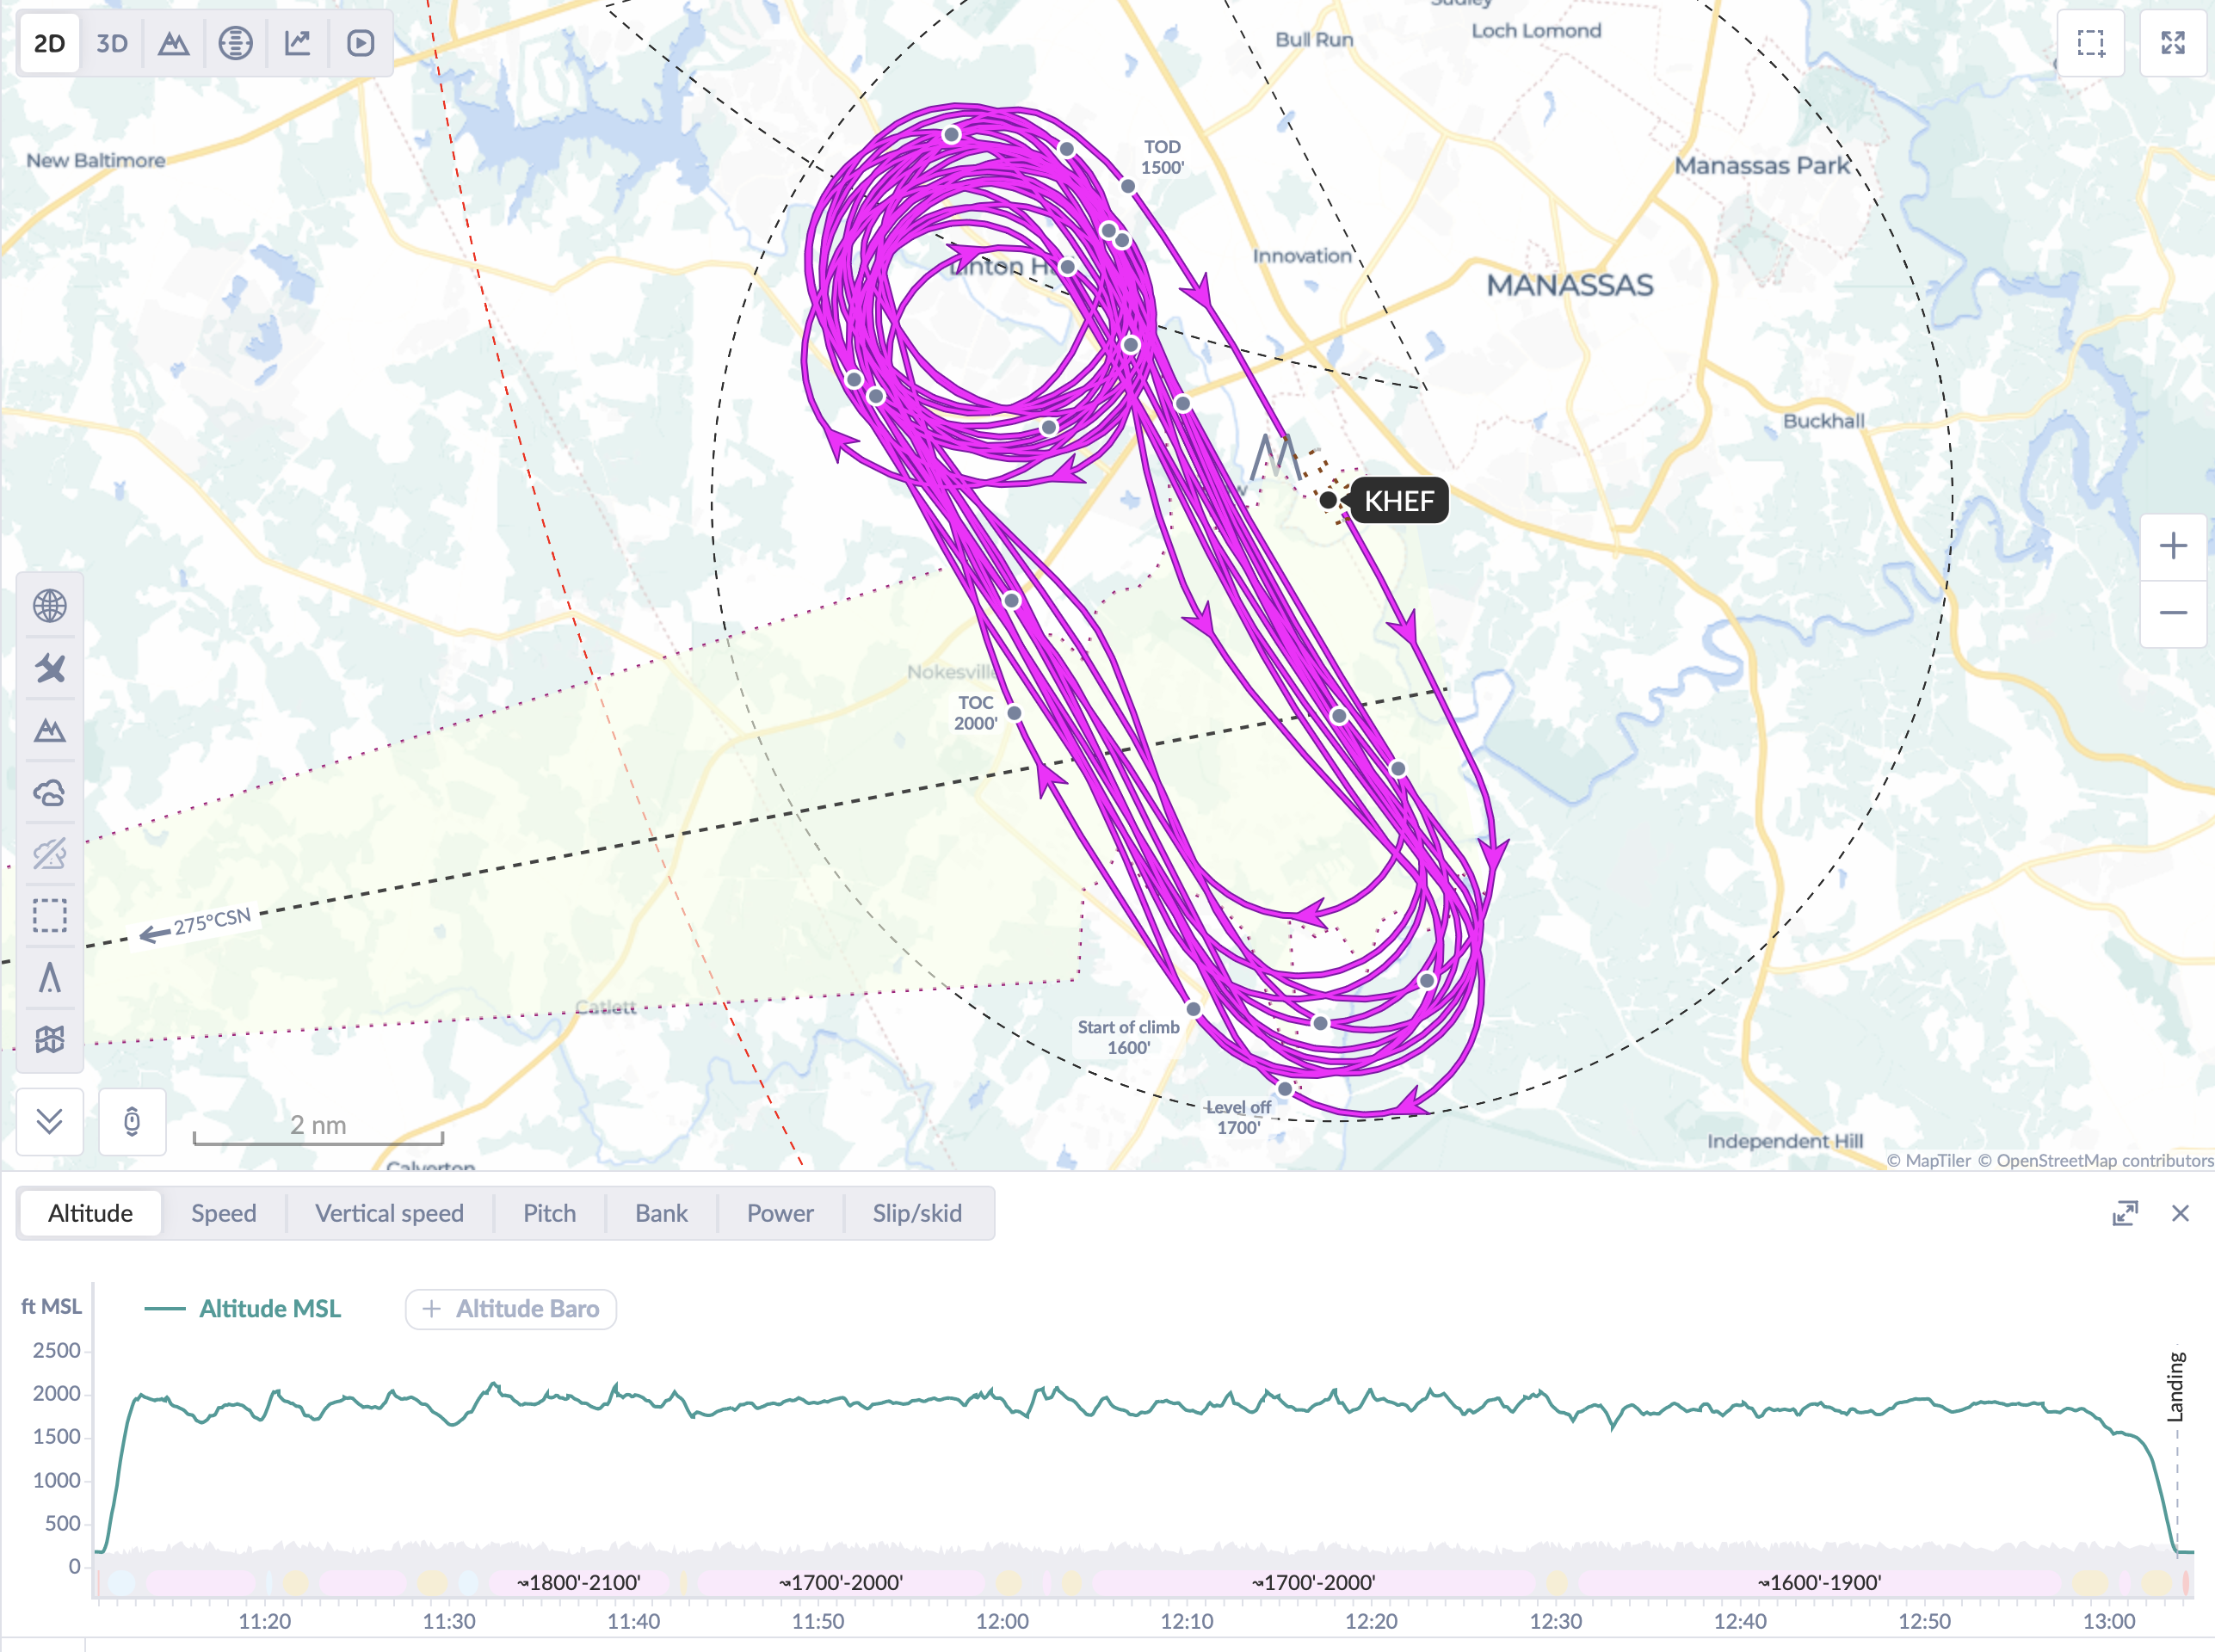
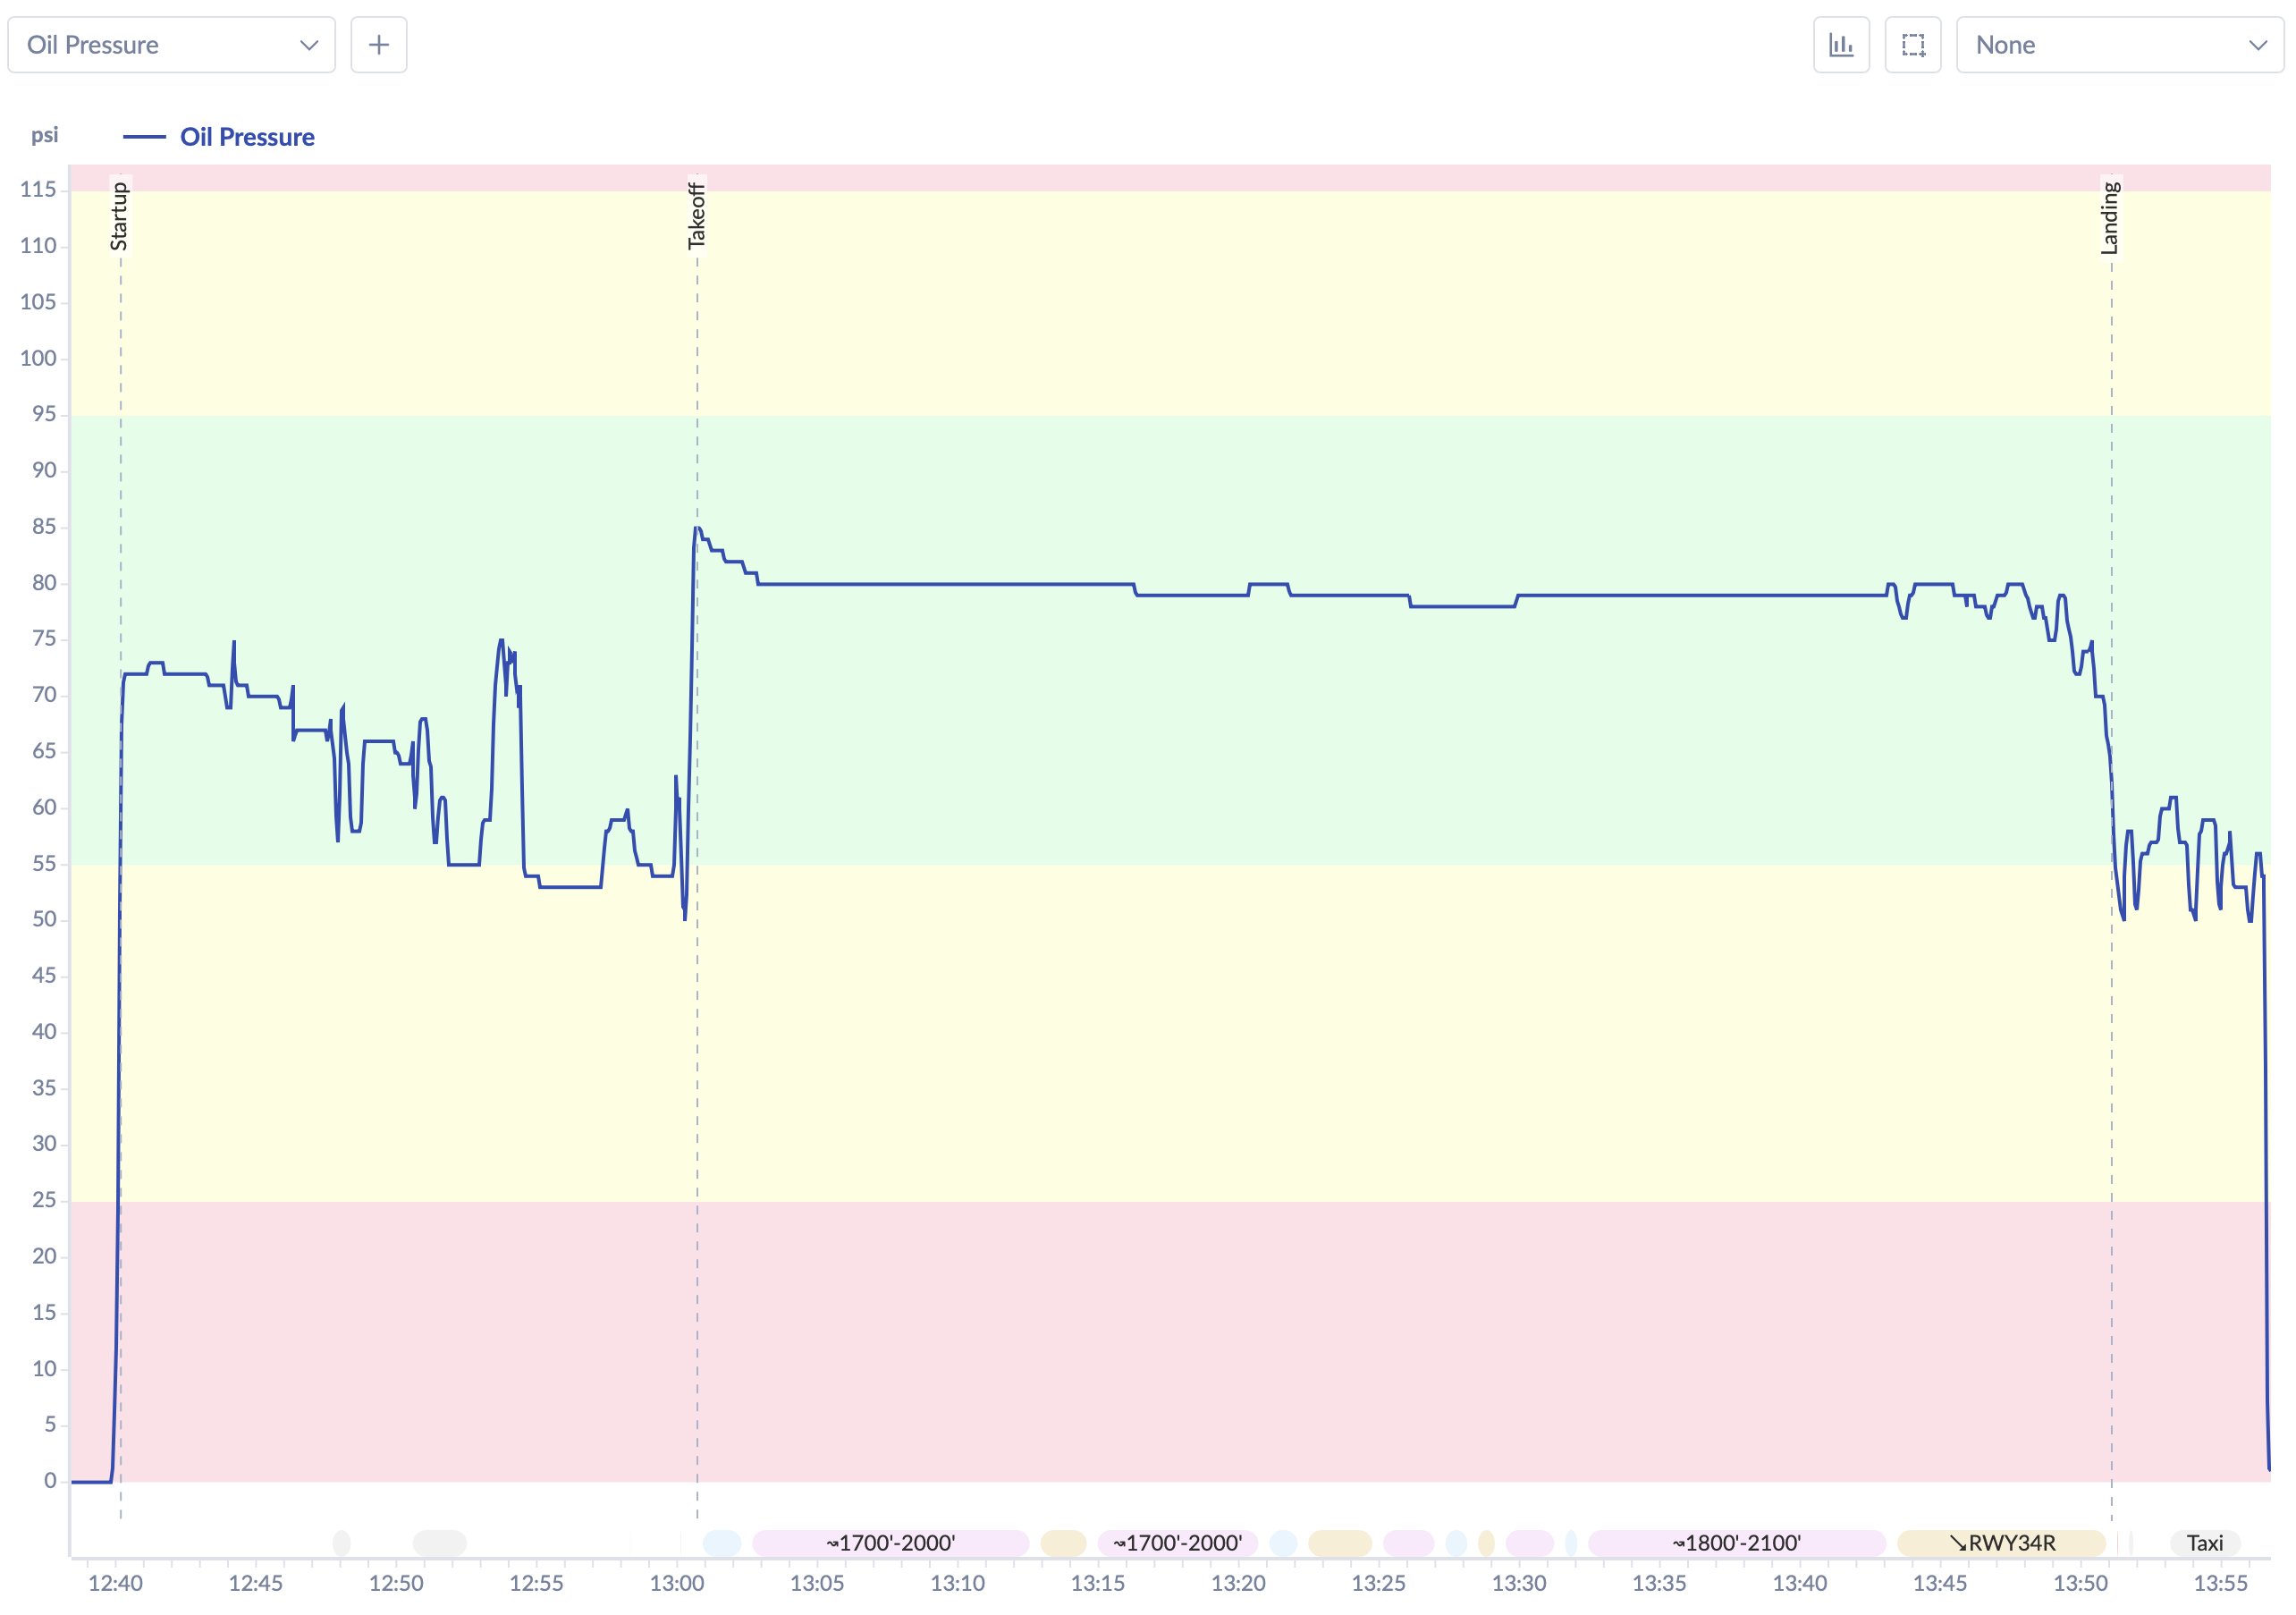
After the first five flights it was clear that N997CZ was sitting on more vibration than I wanted. The most visible symptom was the ADAHRS percent-deviation values logged by the G3X — they were chronically high during cruise on every one of the first five flights, and Garmin tech support had pointed out that high deviation values are often a sign that the attitude solution is fighting more vibration than it wants to. So when the airplane went into the hangar for the 25-day maintenance gap between Flight 5 and Flight 6, dynamic propeller balancing was one of three jobs on the list (alongside the CAN bus rewire and the left fuel-gauge float fix).
This is the story of that balance.
What dynamic propeller balancing actually is
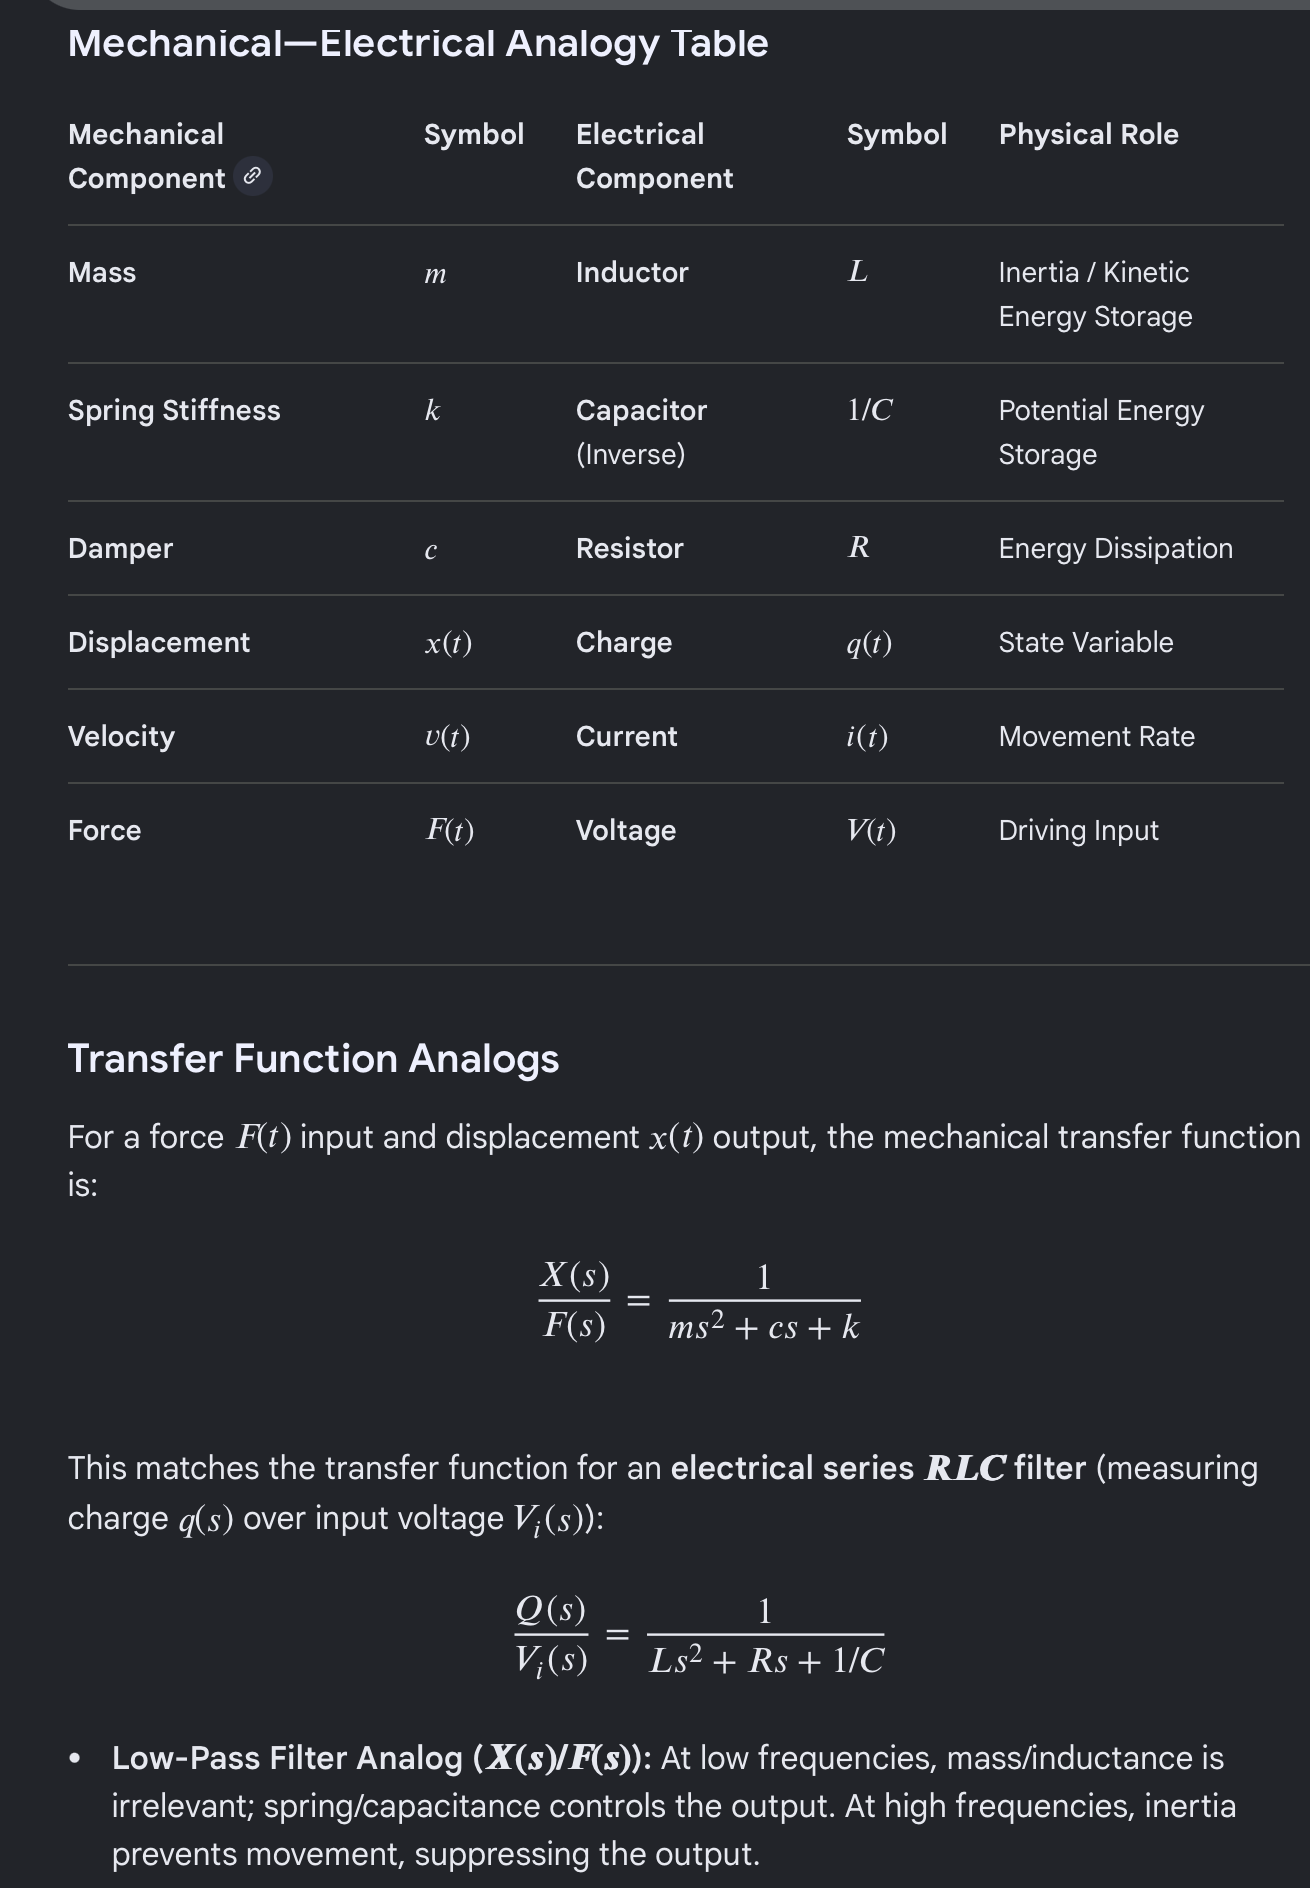
Static balance — the kind you can do with the prop off the airplane on a balance stand — gets the prop to the point where it doesn’t have a preferred resting position. Dynamic balance is the next step: it deals with the residual imbalance that only shows up when the engine and prop are running at their actual operating RPM, with the actual installed combination of crank, flywheel, starter ring, spinner, and prop all spinning together as one mass.
The DynaVibe Classic balancer (RPX Technologies) does it with two sensors:
- An accelerometer bolted to the top of the engine case, “as far forward as possible for maximum sensitivity… mounted vertically, perpendicular to piston travel.” The standard technique is to pull one of the case bolts along the top of the engine and reinstall it through the bracket that holds the accelerometer.
- An optical pickup mounted on the same bracket, “approximately six inches behind the back of the propeller,” with its beam aimed at a small piece of reflective tape stuck to the back of the spinner backplate or starter ring. The optical pickup gives the balancer a once-per-revolution timing reference so it can tell the balancer not just the magnitude of the vibration but the angular location of the heavy spot.
(Quotes are from the DynaVibe Classic User Manual v1.09.)
With those two sensors hooked up, you start the engine and run it up to a steady cruise RPM — around 2,100 RPM in our case for the Lycoming IO-540. The balancer reads out two numbers: the vibration magnitude in inches per second (IPS), and the clock-angle of the heavy spot measured against the reflective-tape index. Then you stick trim weights opposite the heavy spot, run it again, see whether the magnitude dropped and where the new heavy spot ended up, and iterate.
The DynaVibe puts the result on a clear scale:
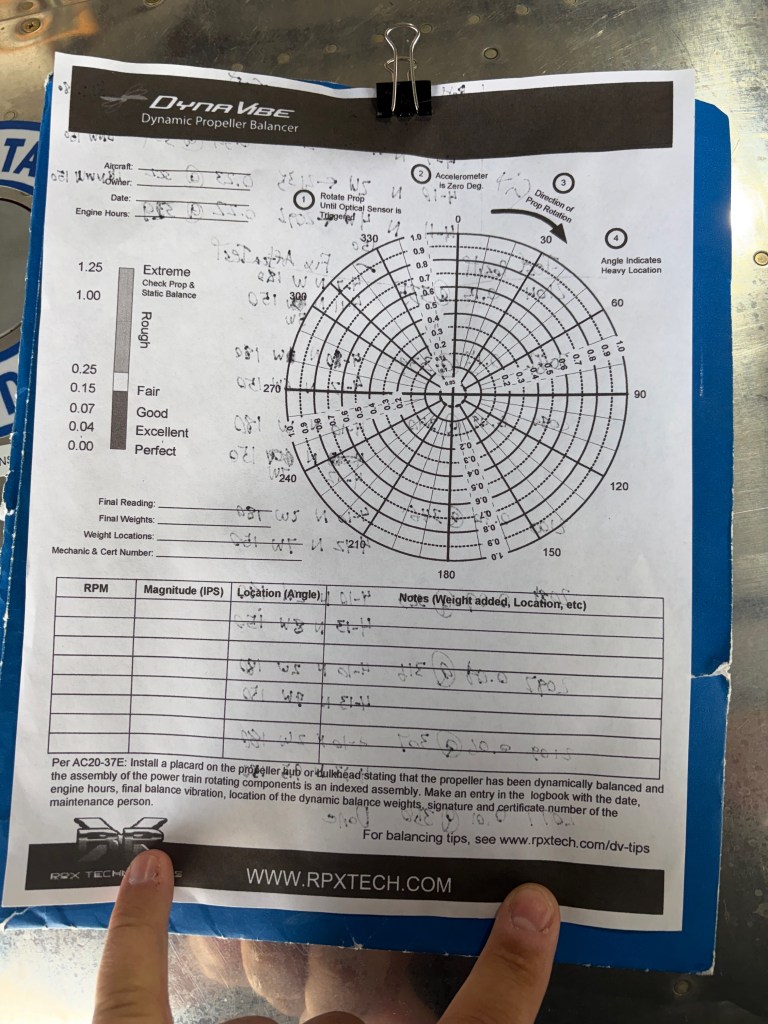
The bands: Perfect under 0.04 IPS, Excellent through 0.07, Good through 0.15, Fair through 0.25, Rough all the way up to 1.00, Extreme above that. Anything in the Good band or better is acceptable for general aviation; Excellent or Perfect is the target if you have the time and patience to chase it.
Trim-weight construction
The trim weights on this airplane go on the starter ring gear, which has twelve bolt holes spaced every 30°. We assembled the weights out of standard hardware: AN4 bolts in various lengths, AN4 washers, and AN4 lock nuts. AN4 is a ¼”-diameter aircraft bolt; the dash number is the length in eighths of an inch — so an AN4-7 is ¼” × ⁷⁄₈” long, an AN4-10 is ¼” × 1¼”, an AN4-13 is ¼” × 1⅝”, and so on.
The catch: each bolt has limited thread engagement for the lock nut, so you can only stack about one or two washers on a given bolt before you have to step up to the next longer bolt size. Bumping the bolt up a length adds the equivalent of a washer or so of weight all on its own, which gives the balancing procedure a slightly quantized feel — you’re not adding weight continuously, you’re adding it in discrete steps of either a washer or a bolt-length-bump.
The session — twelve runs, eleven adjustments
Initial run, before any trim weights were added: 0.57 IPS at 345° at 2105 RPM. Solidly in the Rough band.
What follows is the entire in-hangar log:

Decoded as a table — each row is one measurement, the “Fix applied” column is what we added or changed between this run and the next, and the rightmost column is the running weight state the airplane was carrying when the next measurement was taken:
| # | RPM | IPS | Heavy spot | Fix applied for next run | Running weight state after fix |
|---|---|---|---|---|---|
| 1 (bare prop) | 2105 | 0.57 | 345° | AN4-7 + nut + 1 washer at 180° | 180°: AN4-7 N+W |
| 2 | 2144 | 0.34 | 334° | AN4-7 + nut + 1 washer at 150° | 180°: AN4-7 N+W · 150°: AN4-7 N+W |
| 3 | 2135 | 0.23 | 322° | Upgrade 150° to AN4-10 + nut + 2 washers | 180°: AN4-7 N+W · 150°: AN4-10 N+2W |
| 4 | 2096 | 0.22 | 329° | 150°: AN4-10 → AN4-11; washers 2 → 4 | 180°: AN4-7 N+W · 150°: AN4-11 N+4W |
| 5 | 2104 | 0.15 | 335° | One more washer at 150° (bolt stays AN4-11) | 180°: AN4-7 N+W · 150°: AN4-11 N+5W |
| 6 | 2082 | 0.13 | 339° | 150°: AN4-11 → AN4-12; washers 5 → 6 | 180°: AN4-7 N+W · 150°: AN4-12 N+6W |
| 7 | 2080 | 0.09 | 340° | 180° → AN4-10 N+W; 150° adds washer → AN4-12 N+7W | 180°: AN4-10 N+W · 150°: AN4-12 N+7W |
| 8 | 2100 | 0.10 | 346° | Add washer at 180° → AN4-10 N+2W | 180°: AN4-10 N+2W · 150°: AN4-12 N+7W |
| 9 | 2084 | 0.09 | 323° | 150°: AN4-12 → AN4-13; washers 7 → 8 | 180°: AN4-10 N+2W · 150°: AN4-13 N+8W |
| 10 | 2082 | 0.08 | 316° | One more washer at 150° → AN4-13 N+9W | 180°: AN4-10 N+2W · 150°: AN4-13 N+9W |
| 11 | 2109 | 0.06 | 307° | Add a thin (half) washer at 150° → AN4-13 N+9.5W | 180°: AN4-10 N+2W · 150°: AN4-13 N+9.5W |
| 12 | 2077 | 0.01 | 350° | Done — achieved 0.01 twice with DynaVibe averaging (the instrument floor) | Final installed: 180°: AN4-10 N+2W · 150°: AN4-13 N+9.5W |
A couple of things worth noting from the table:
- The heavy-spot angle moved around the clock as the magnitude came down. It started at 345°, walked counterclockwise to 307° by step 11, then jumped to 350° on the final run. Once you’re in the Good / Excellent range, the angular position is increasingly noise-dominated — small changes in RPM, OAT, or run-to-run engine settling can shift the indicated heavy-spot by tens of degrees while the magnitude barely moves.
- The step backward at #8 (0.09 → 0.10) is the classic instrument-floor signature. When you’re under ~0.1 IPS, the noise floor of the balancer is comparable to the imbalance you’re trying to chase, and small runs that look like regressions are usually just measurement scatter. We worked through it and kept converging.
- The final two readings used the DynaVibe’s averaging mode — it takes multiple-revolution samples and reports a stable mean. We saw 0.01 twice in a row in that mode, which is essentially the floor of the instrument. Calling it done was an easy decision.
The convergence as a polar “bullseye” plot — each dot is one measurement, walking from the Rough band on the outer edge in toward Perfect at the center:
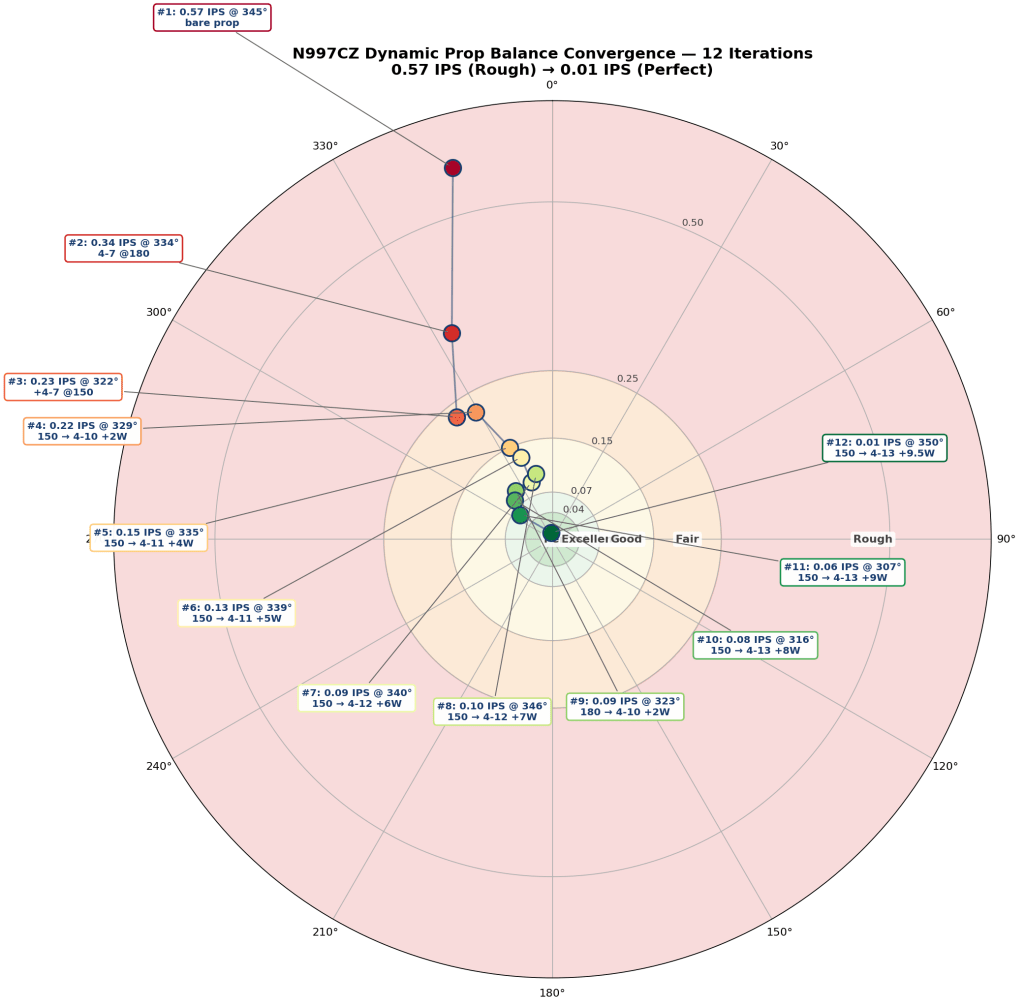
End to end the magnitude trended:
0.57 → 0.34 → 0.23 → 0.22 → 0.15 → 0.13 → 0.09 → 0.10 → 0.09 → 0.08 → 0.06 → 0.01 IPS.
Twelve runs, eleven trim-weight changes, the better part of an afternoon, and the airplane went from Rough to Perfect. A ~57× reduction in cruise vibration magnitude.
What it bought me in flight
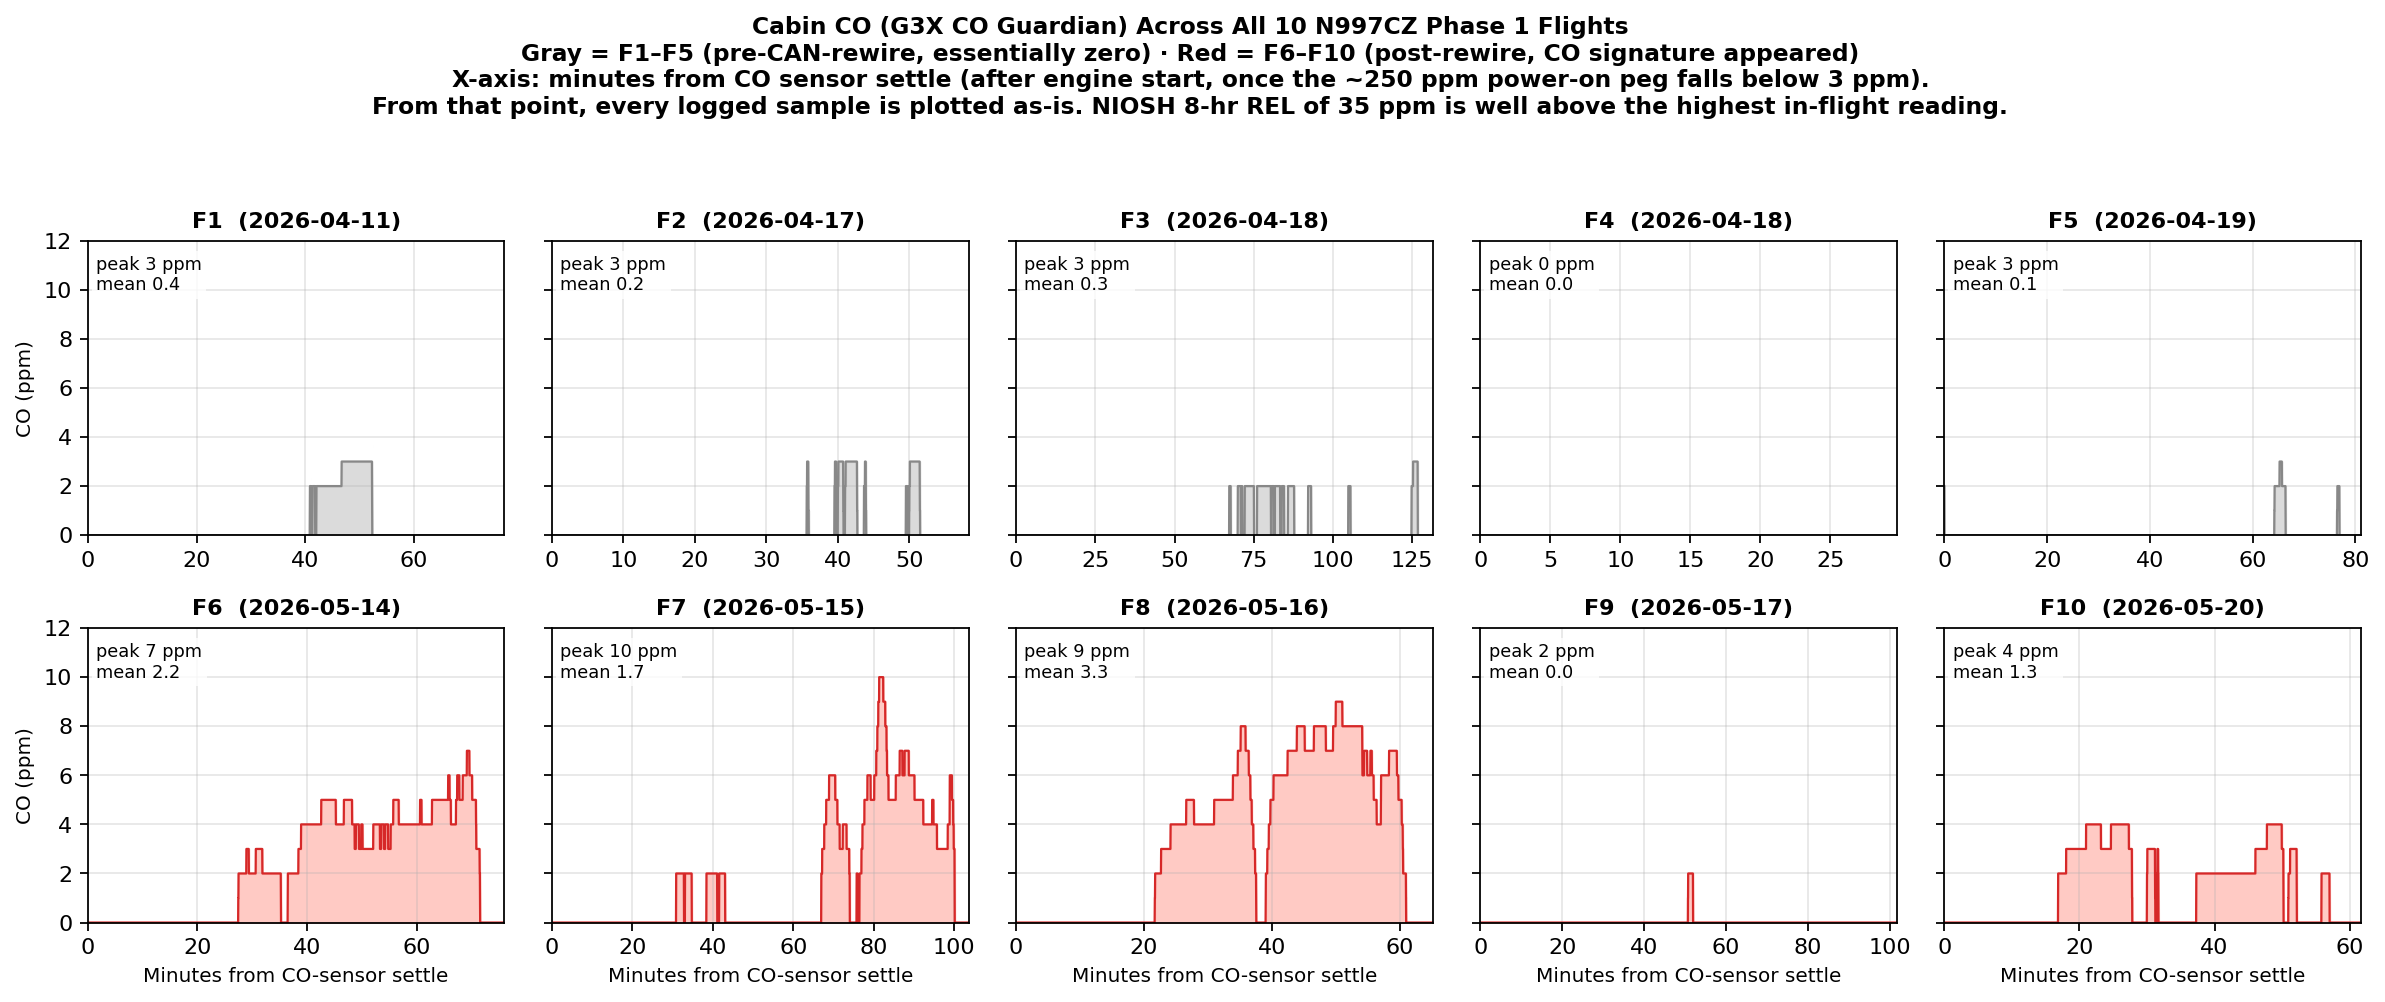
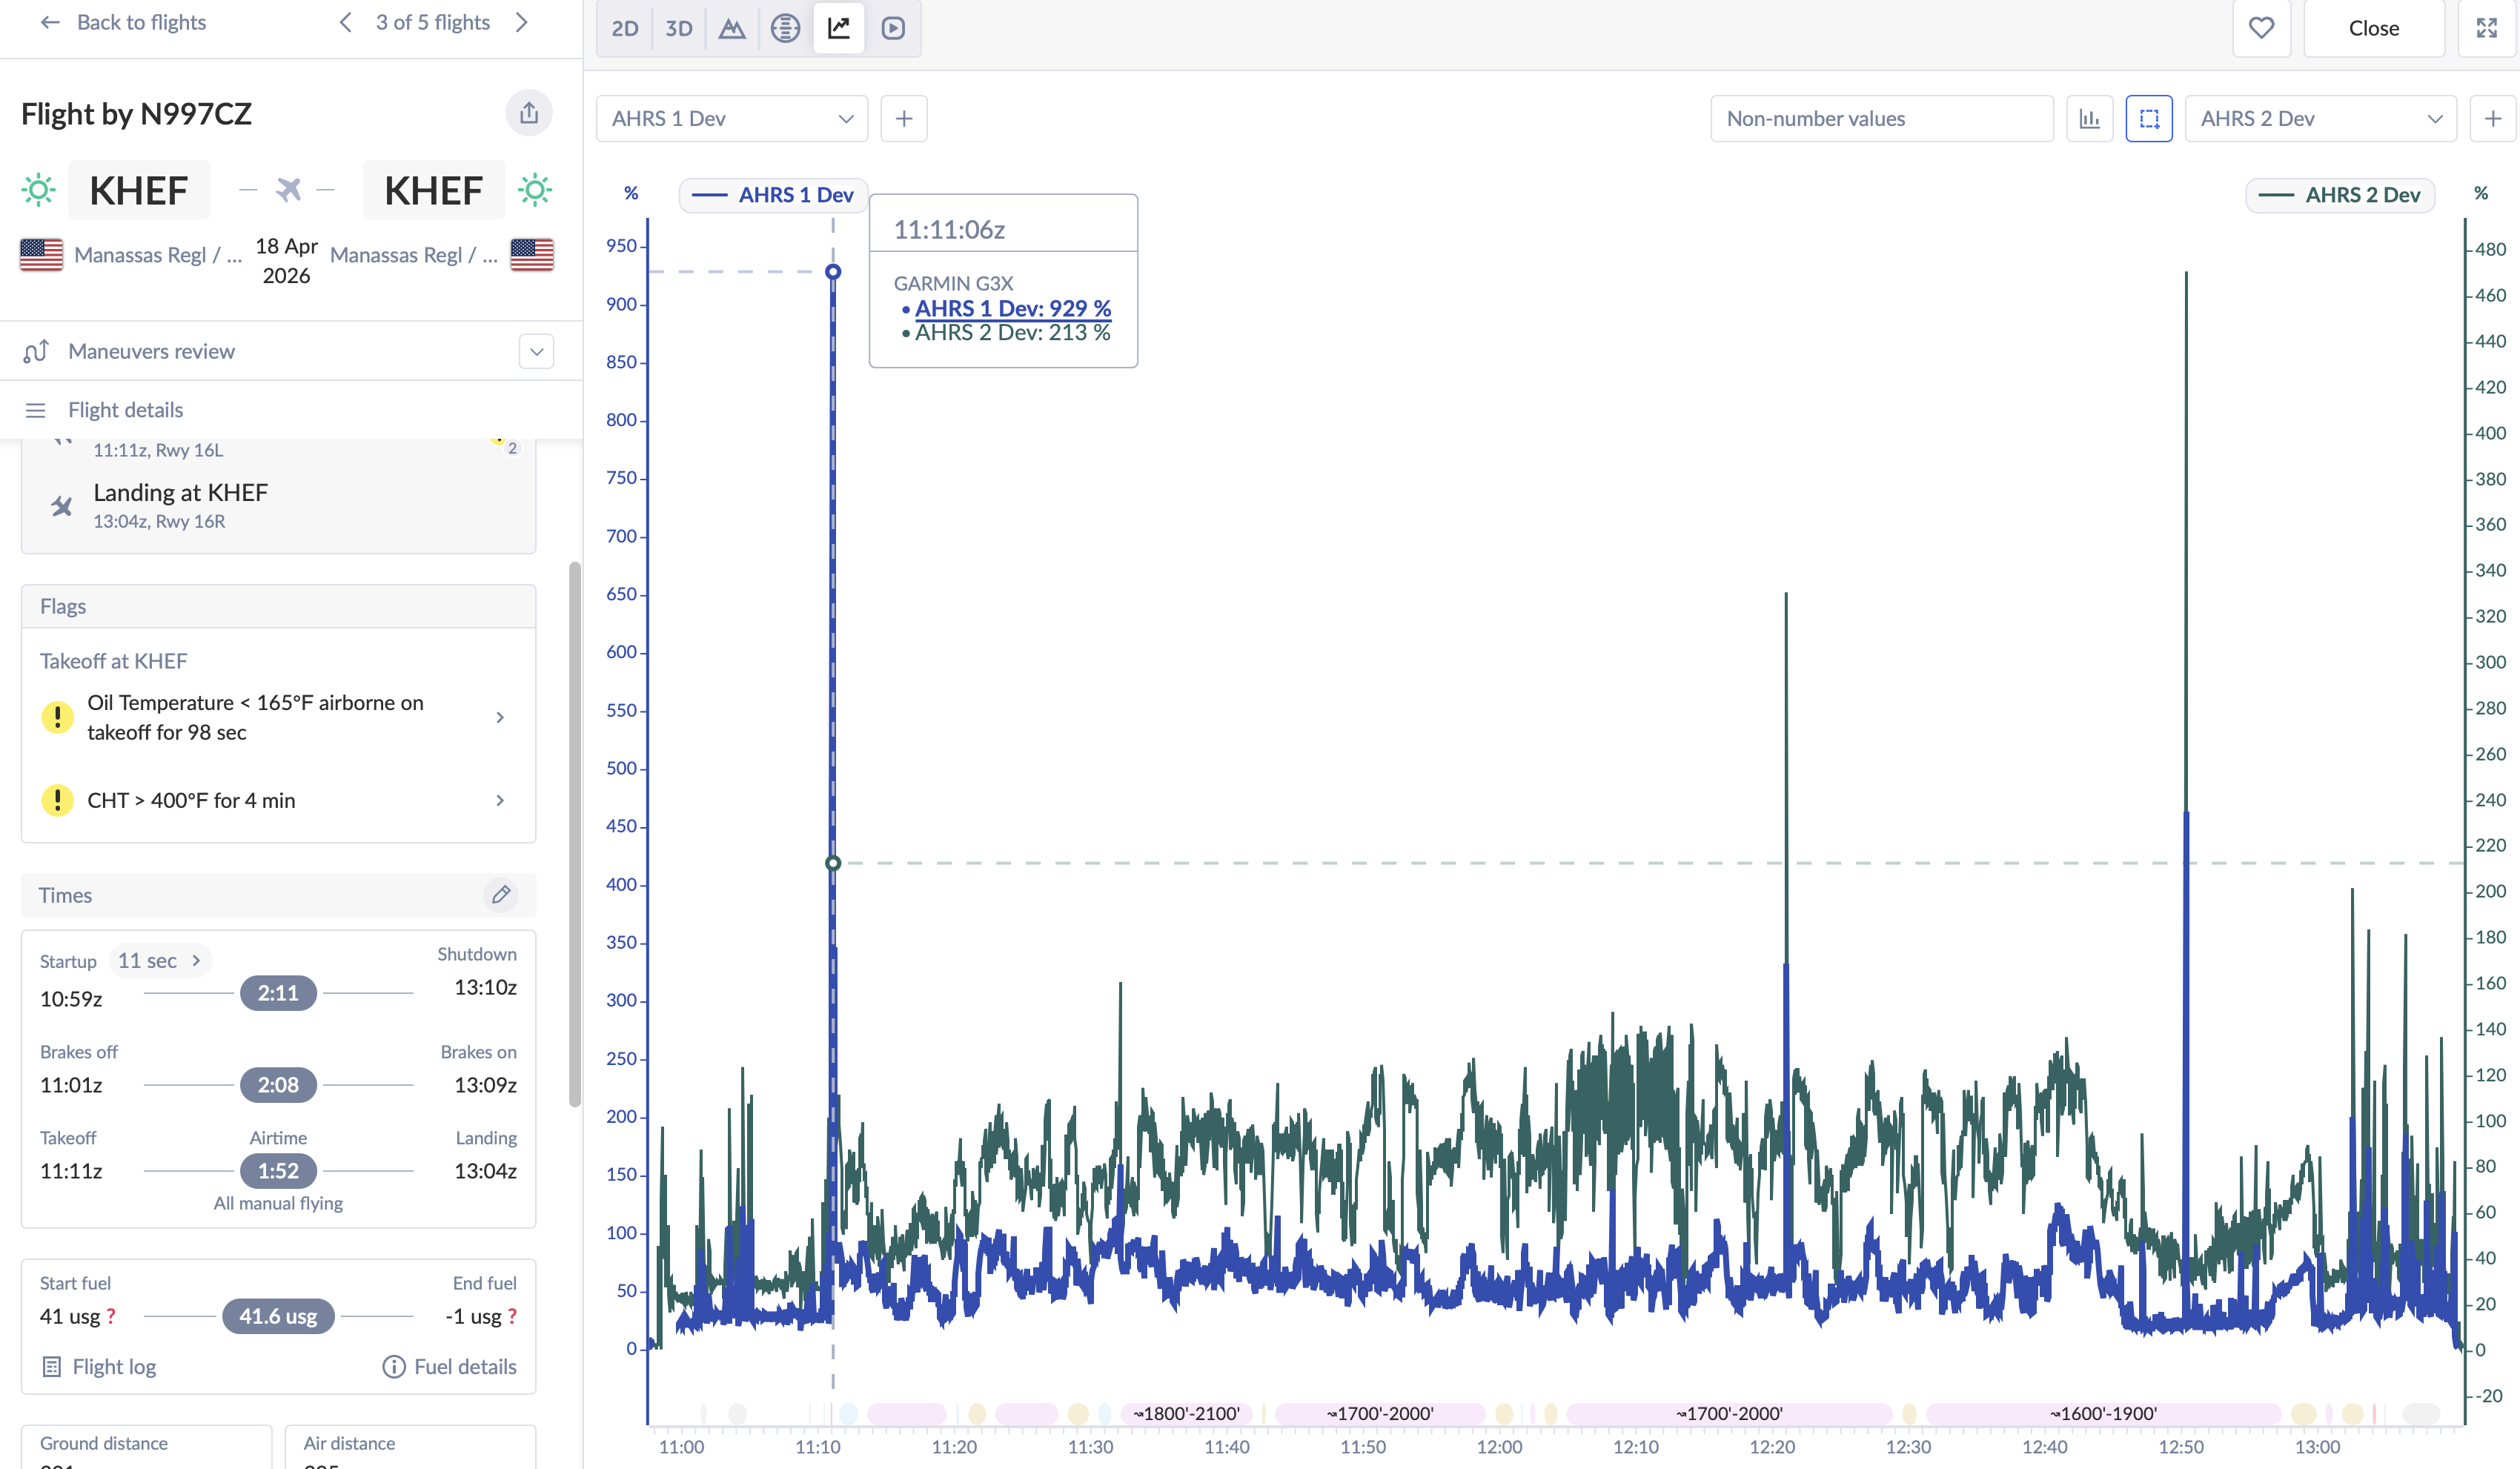
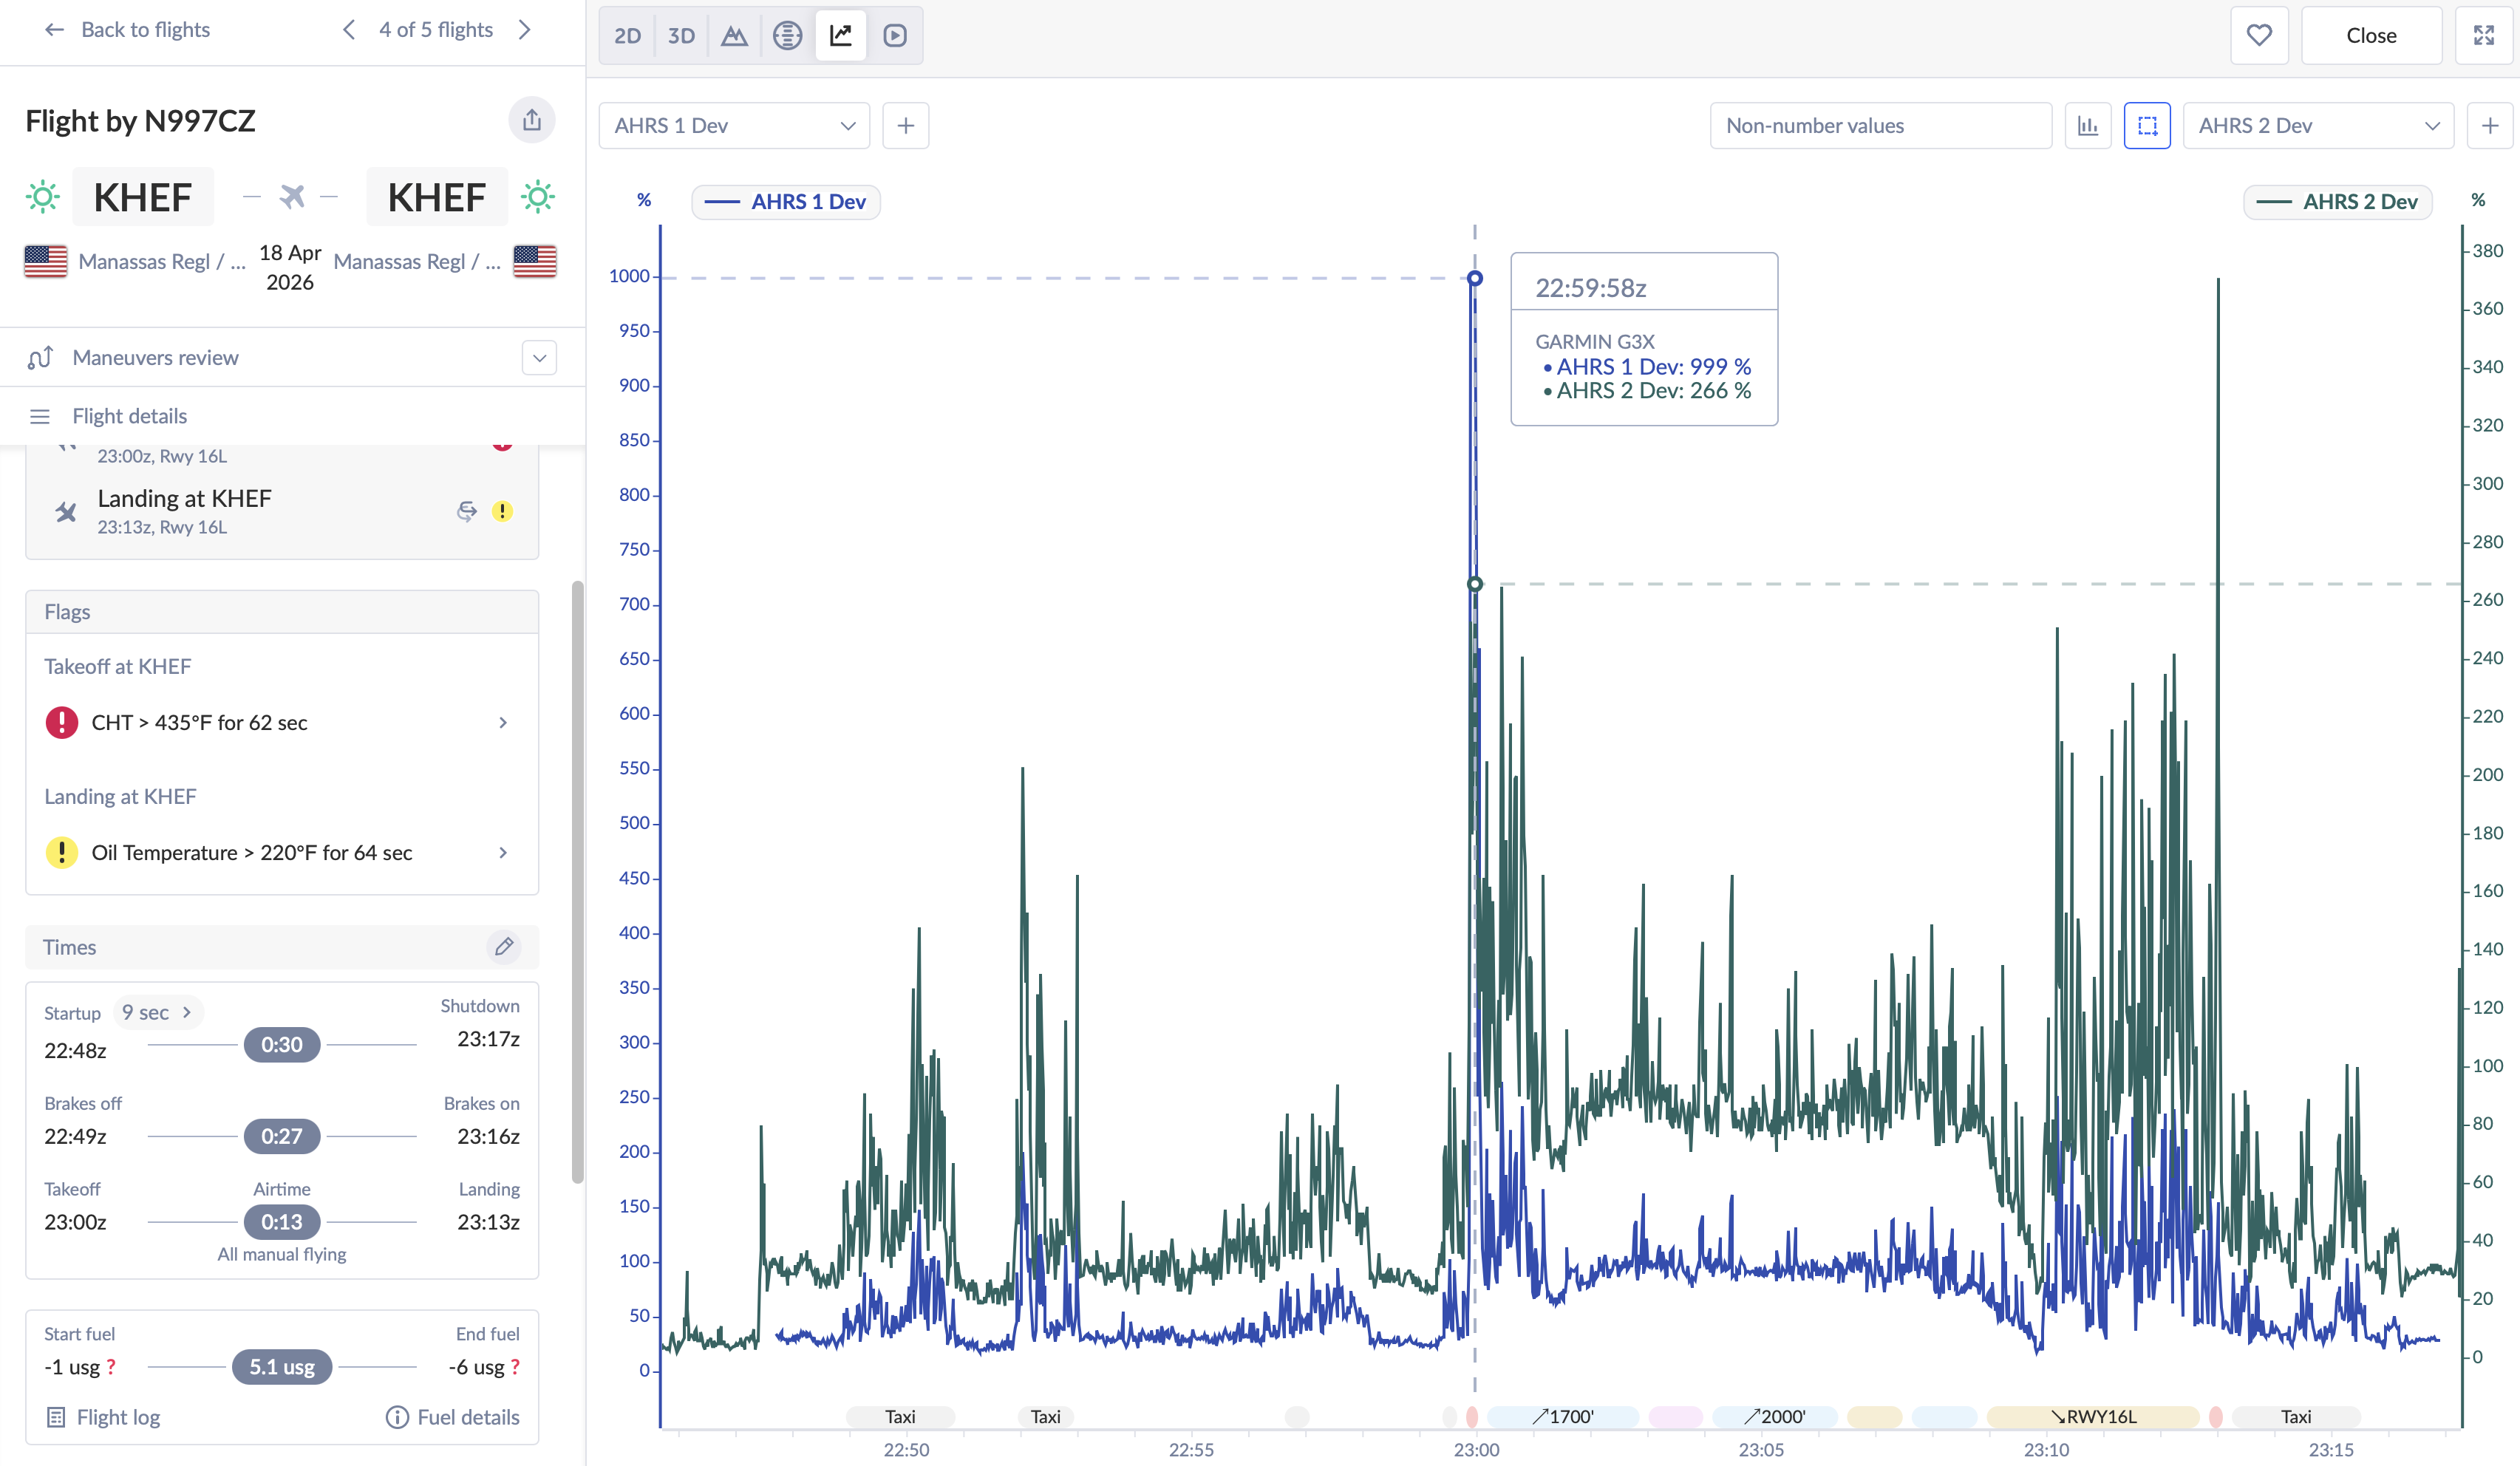
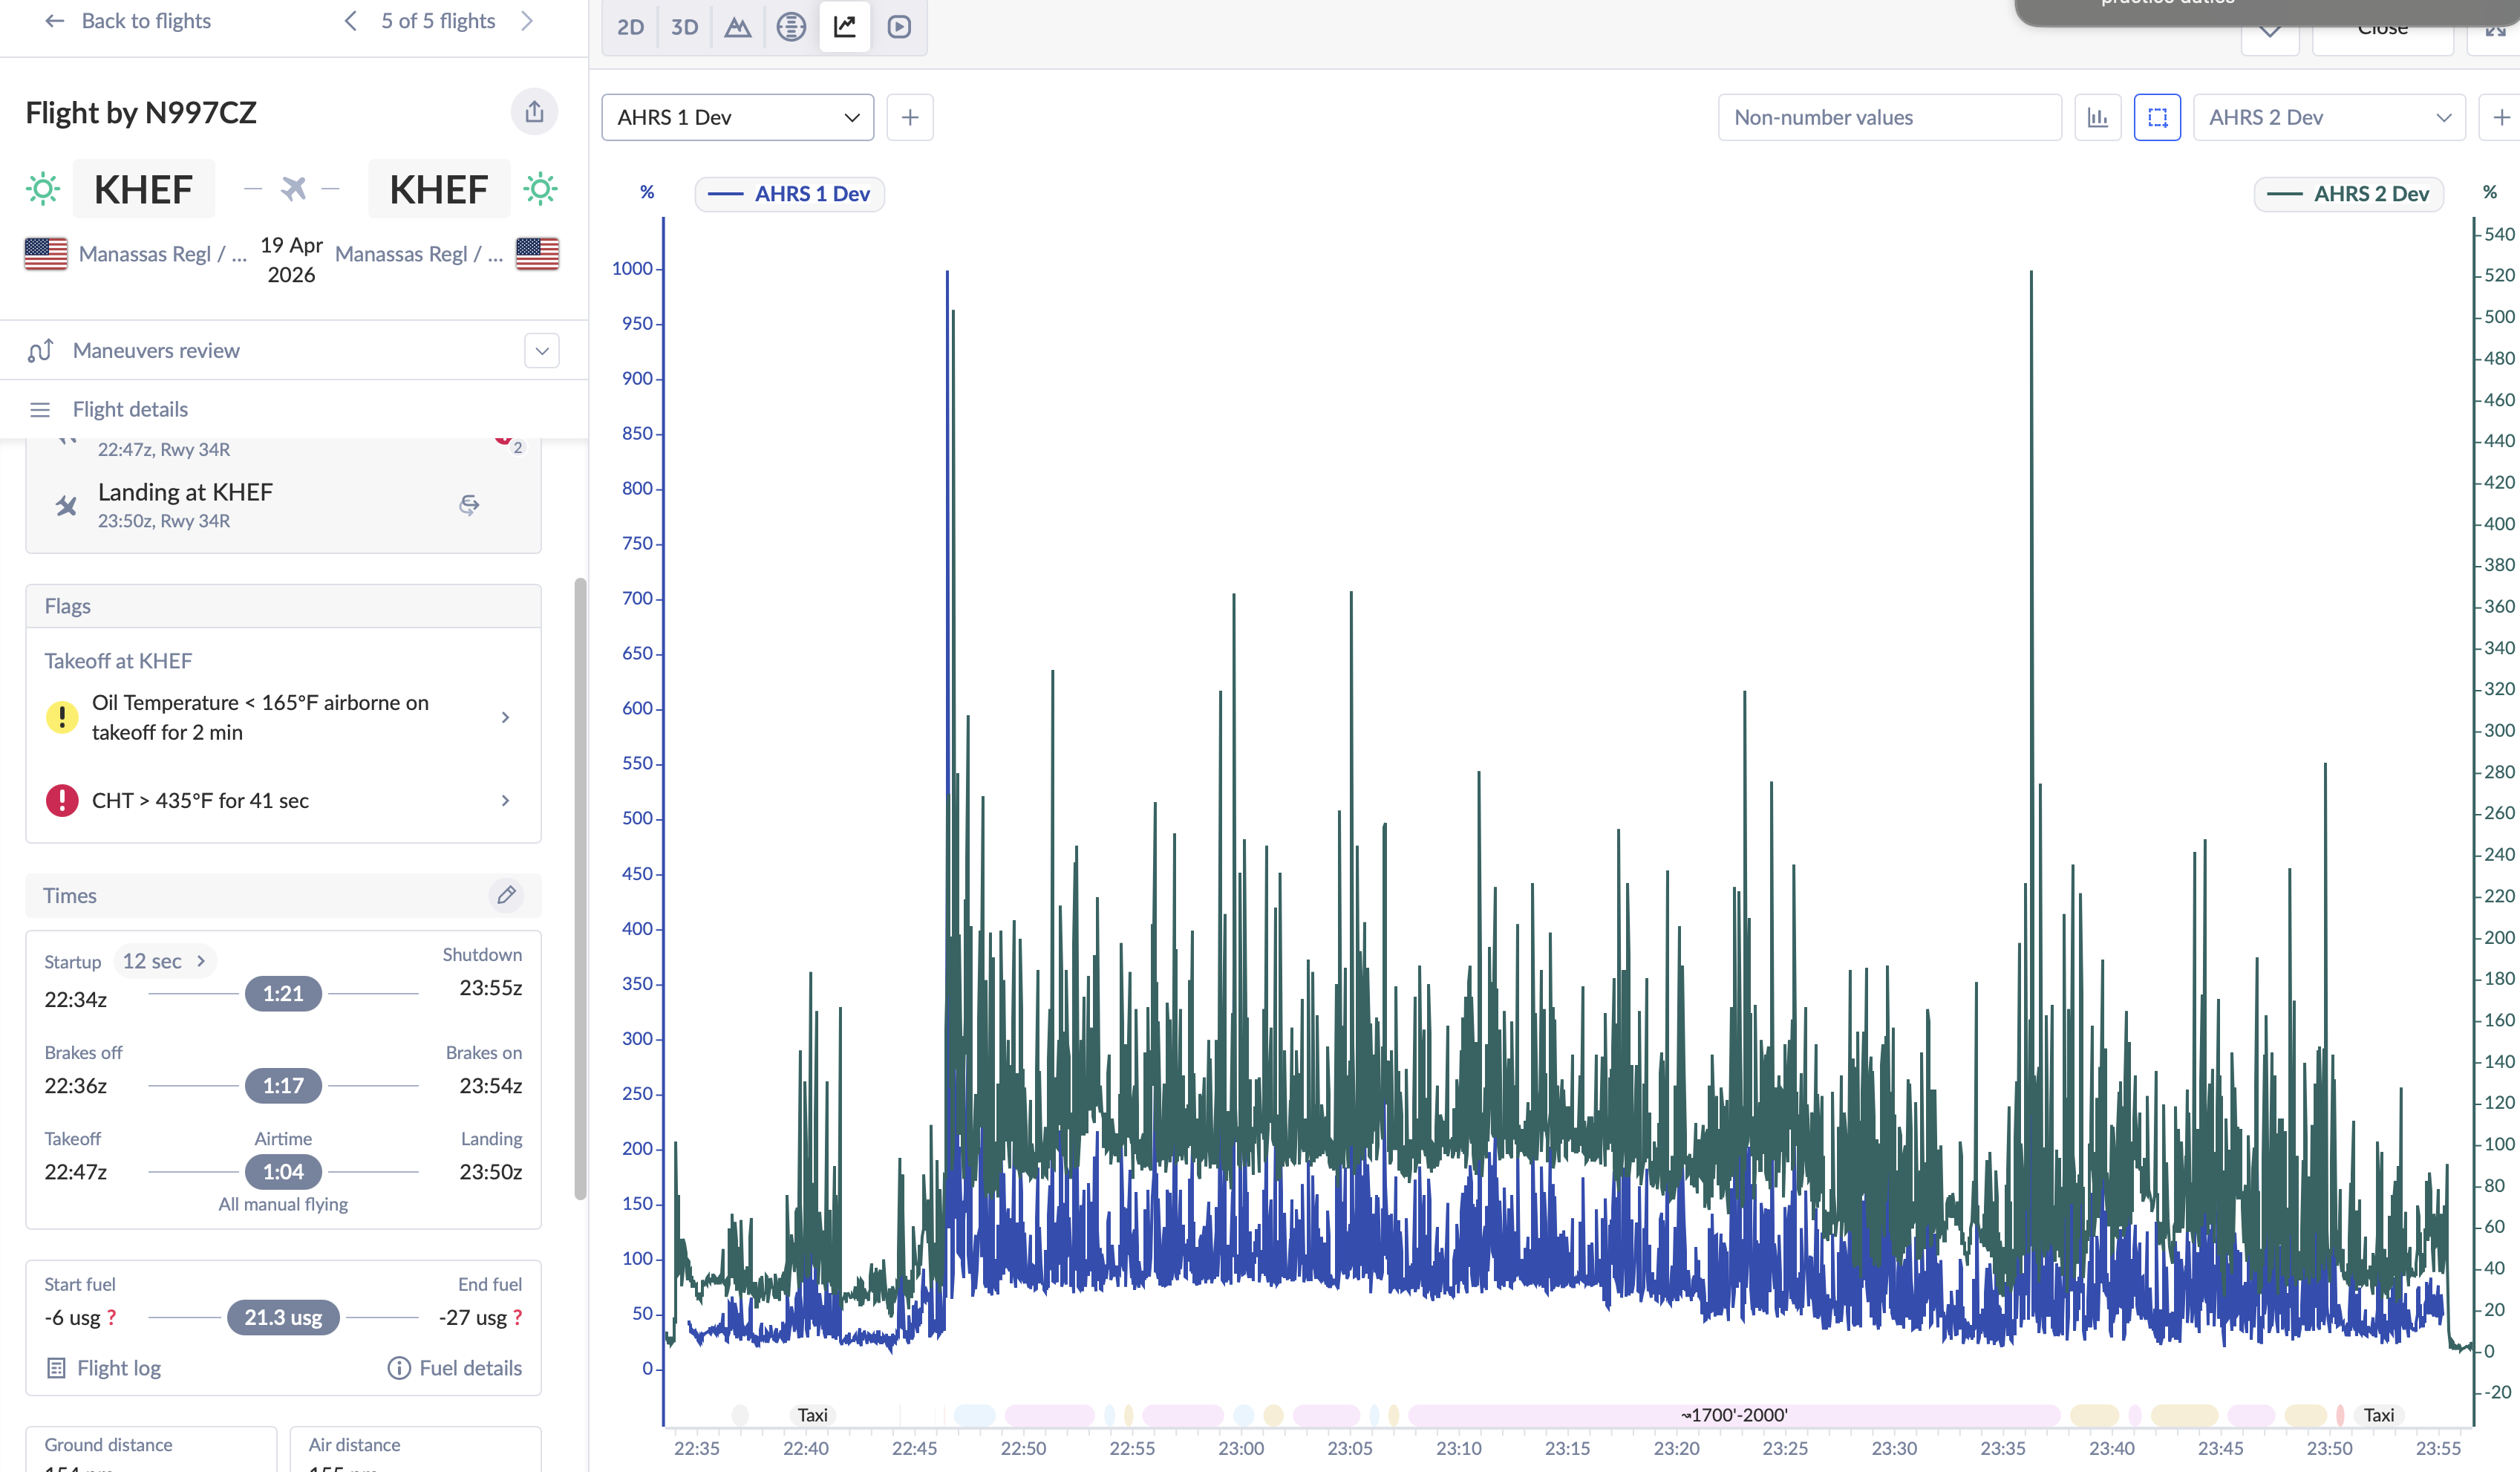
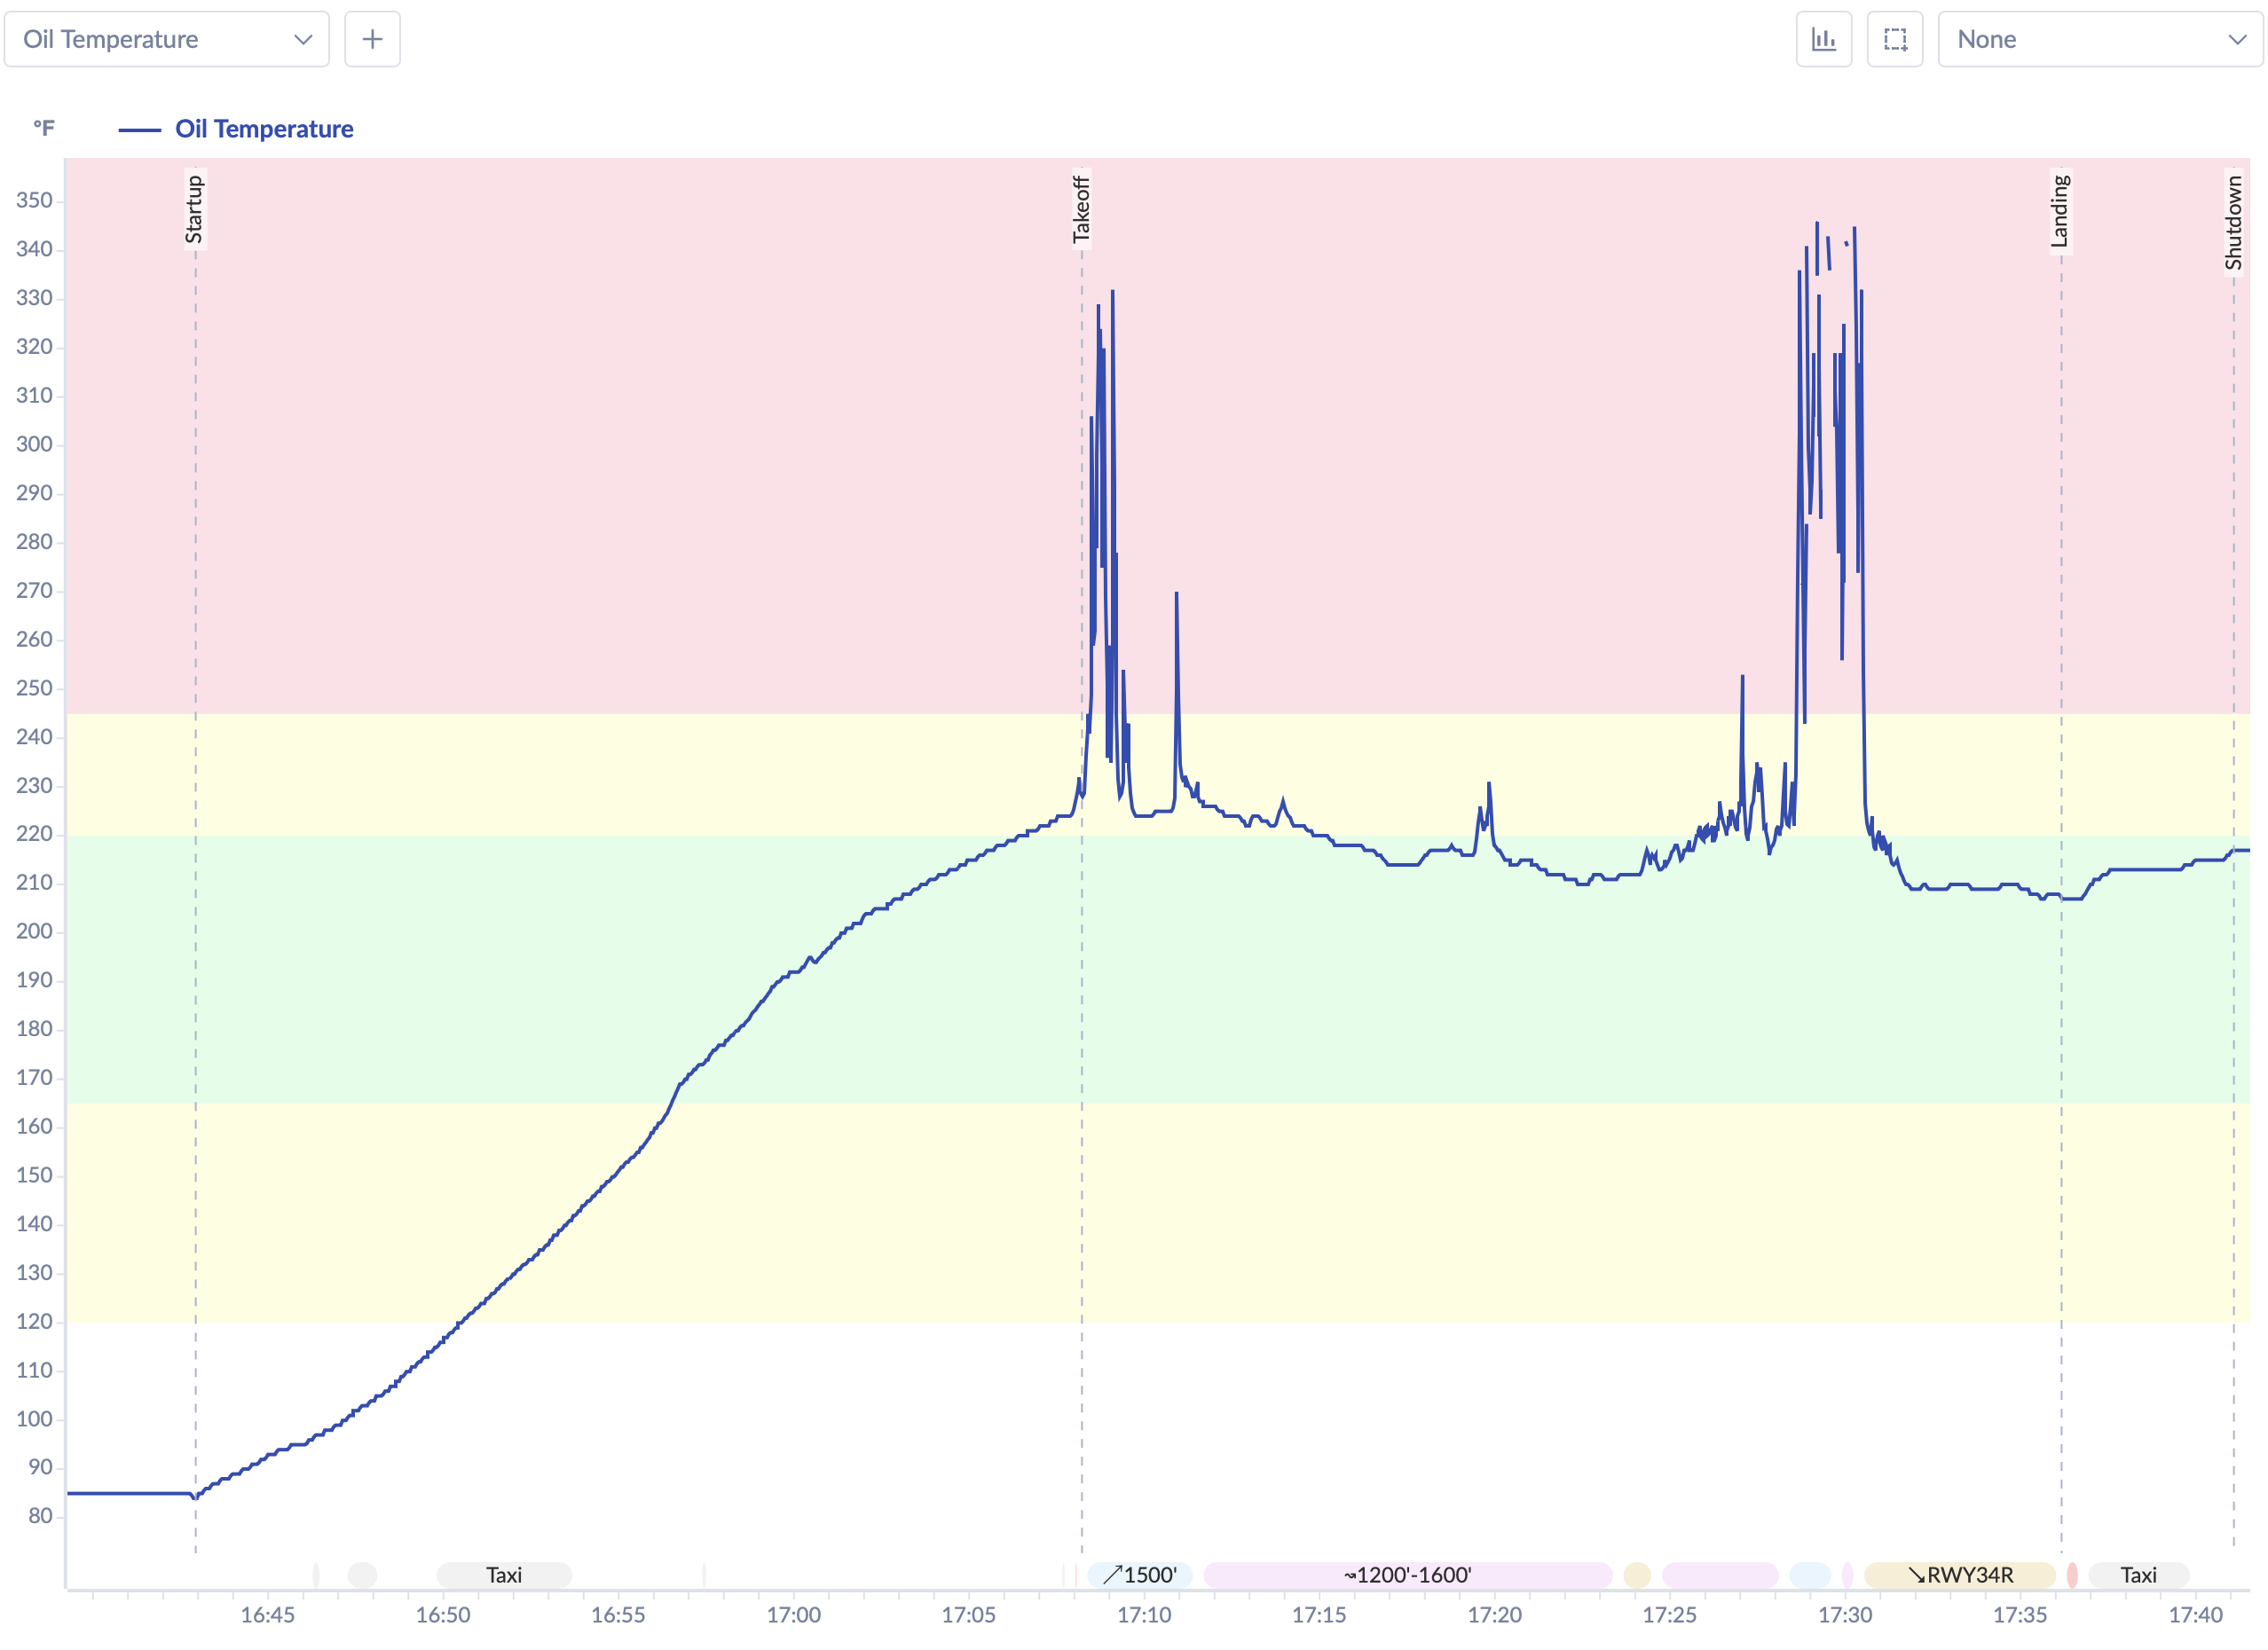
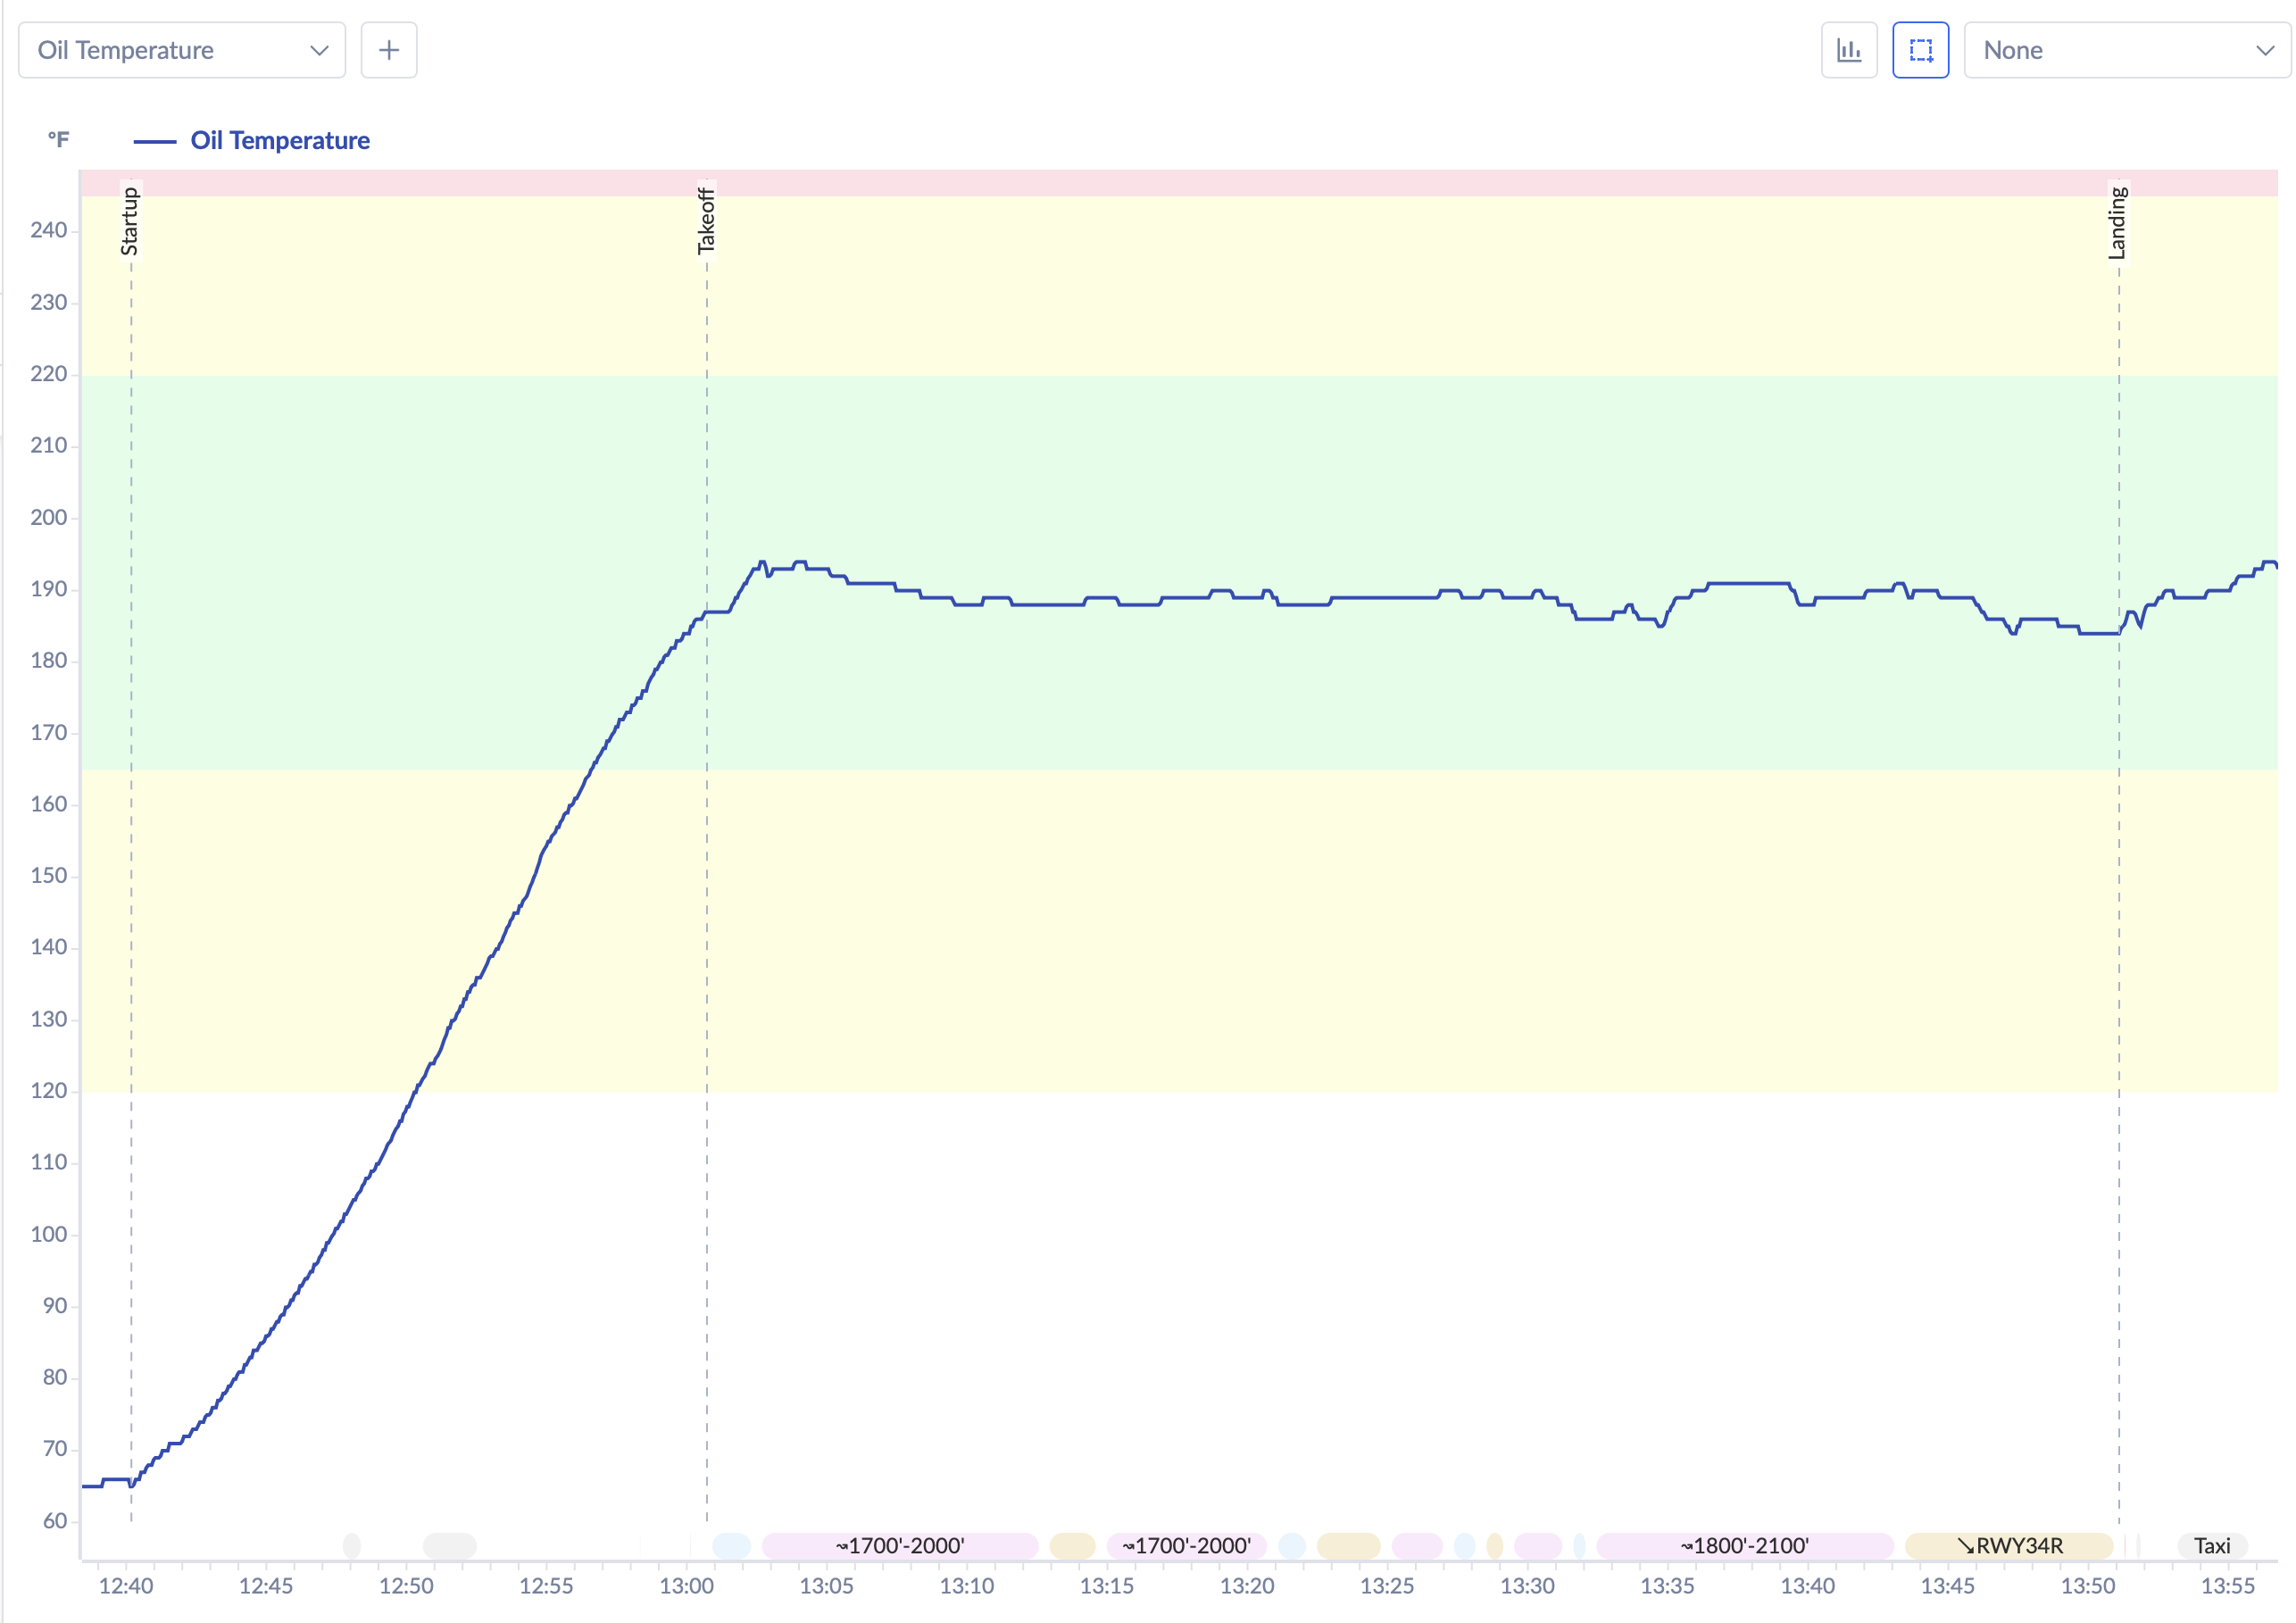
The whole point of doing this was to clean up the ADAHRS environment. The G3X logs the ADAHRS percent-deviation on every flight for all three units — the two GSU 25C ADAHRSes on the sub-panel, and the G5 standby on the main panel — so the question was whether the flight-after-flight median deviation actually came down once the prop was smooth.
It did:
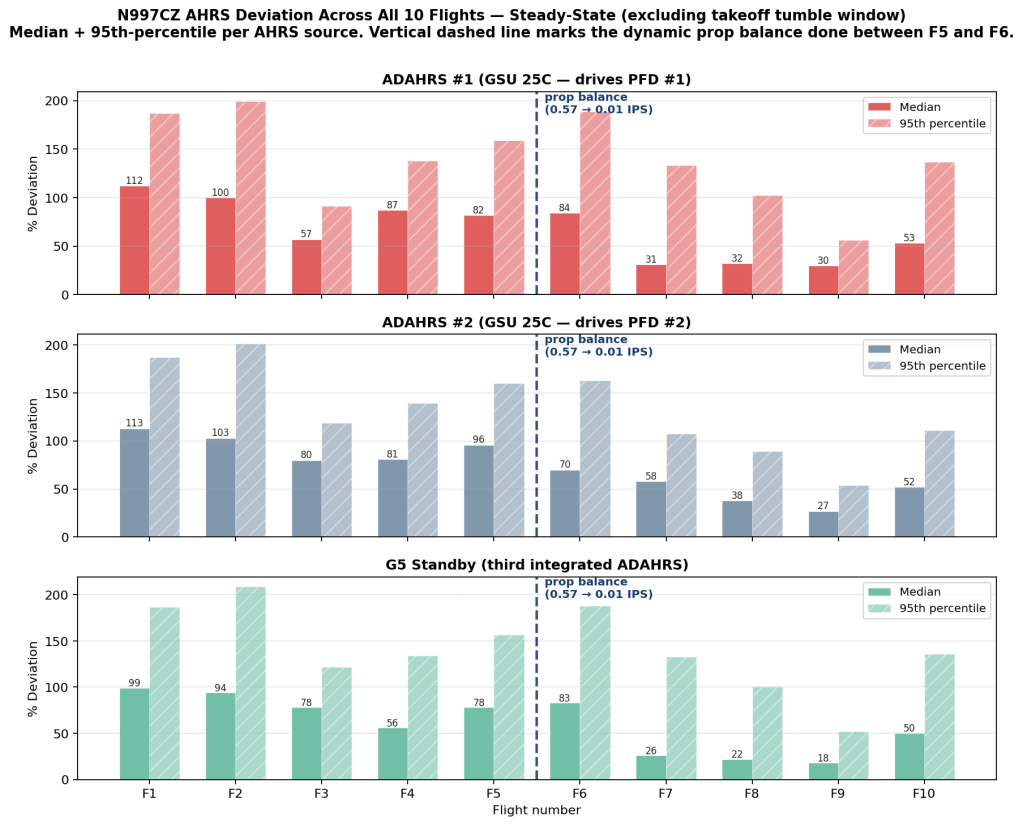
Each panel is one ADAHRS source: the two GSU 25Cs and the G5 standby. The dashed vertical line is where the prop balance happened — between Flight 5 and Flight 6. Median deviation values pre-balance hovered in the 80–115% band across all three units. The first post-balance flight (F6) was a short low-altitude shakedown and showed only modest improvement, but F7 through F9 — the first three flights at altitude after the balance — settled into the 18–58% band. Median deviation roughly halved on the GSU 25Cs and dropped by nearly 75% on the G5.
That last detail — that the G5 showed the biggest relative improvement — fits the geometry: the G5 lives on the main instrument panel, further aft from the firewall and the engine, with more structural compliance in the path between it and the source of the vibration. With the engine vibration that was reaching it now ~57× smaller, the residual deviation on that unit is dominated by other sources, and those sources are small.
What it didn’t fix
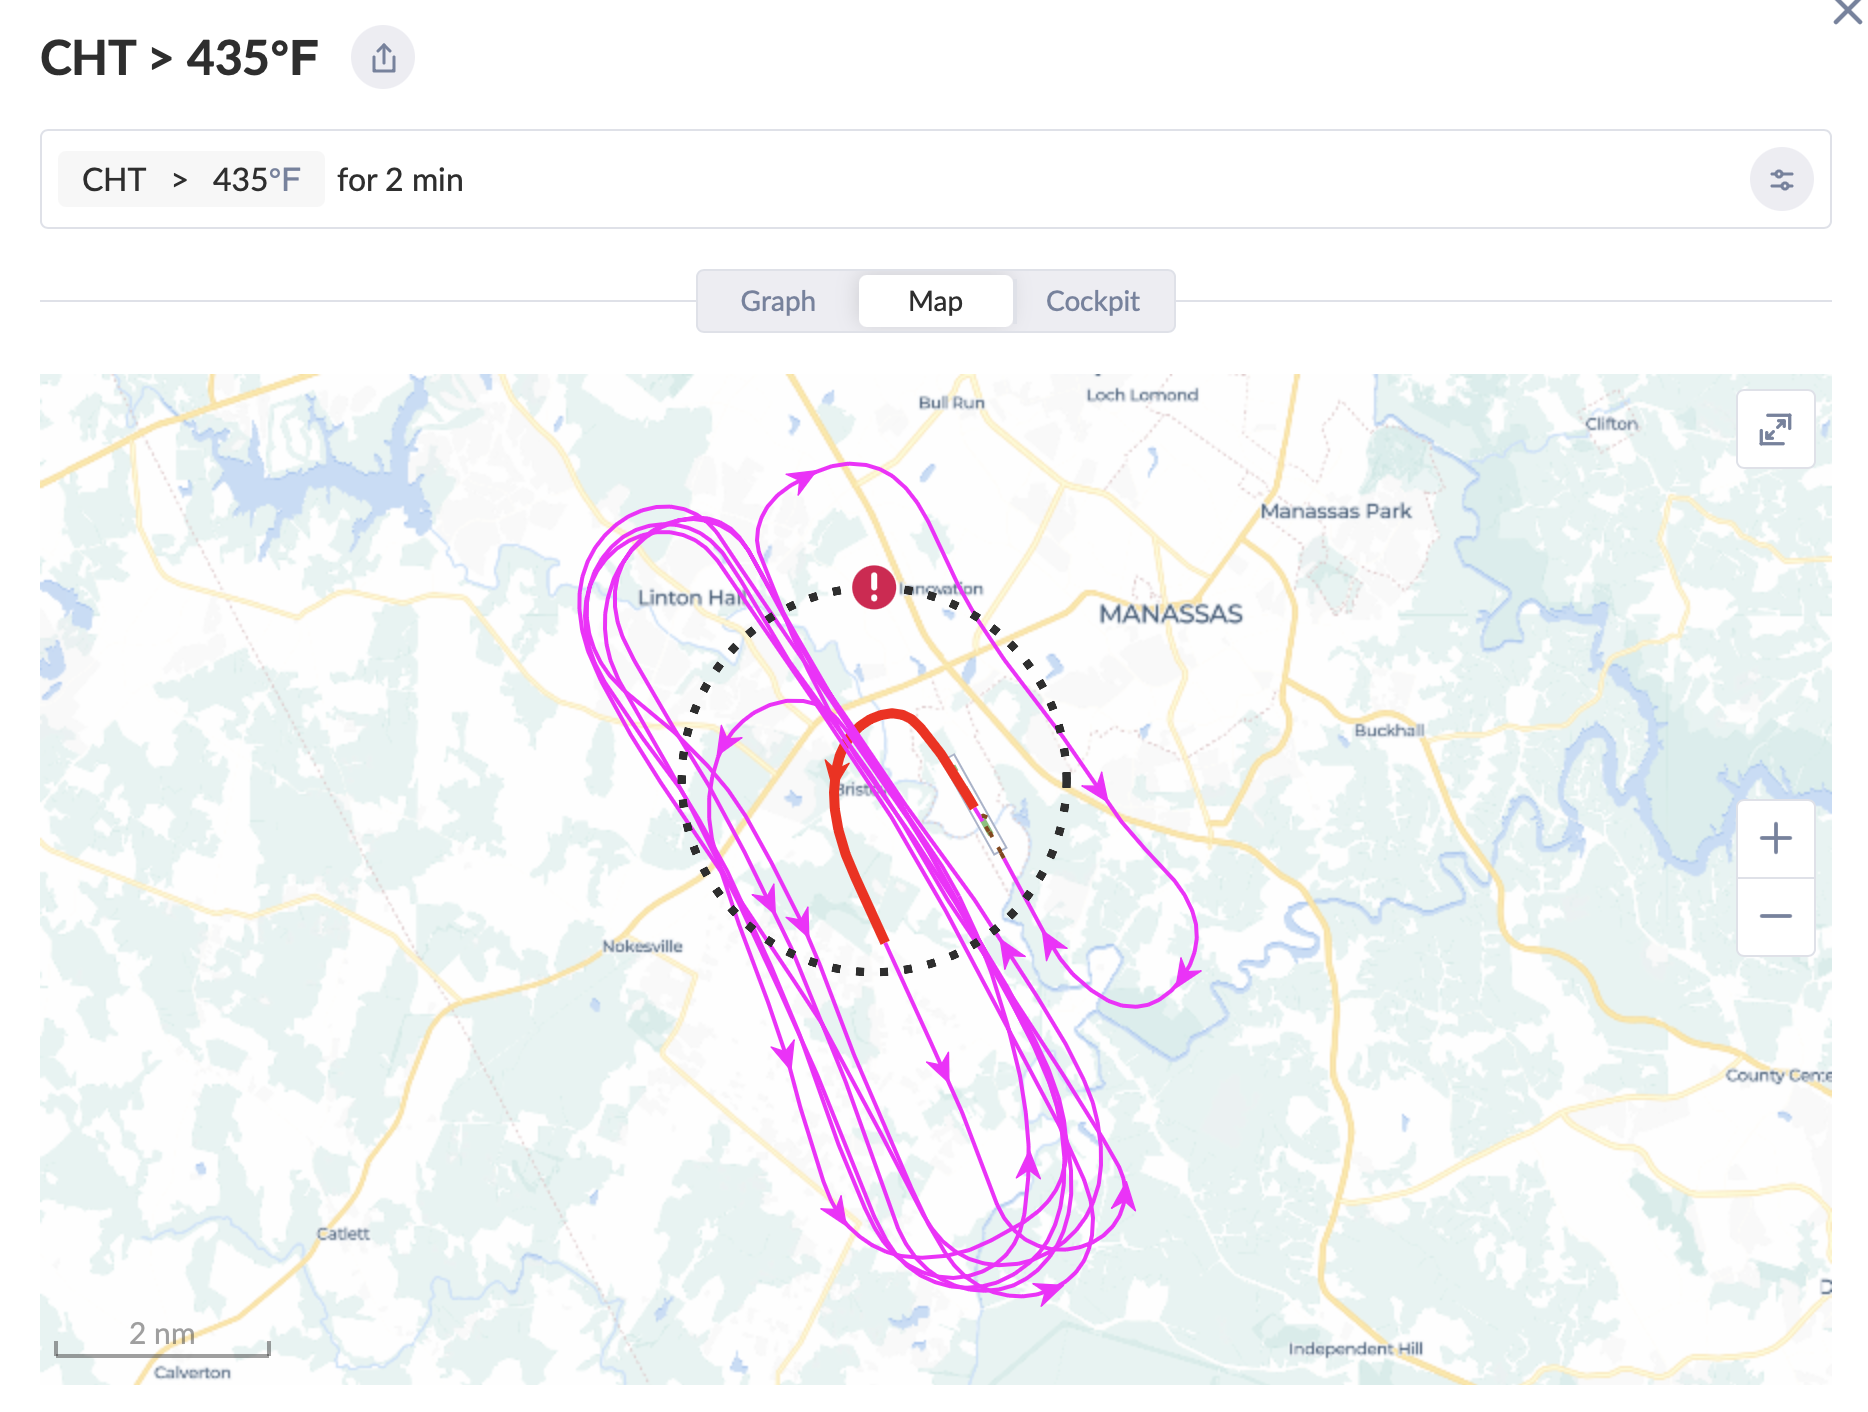
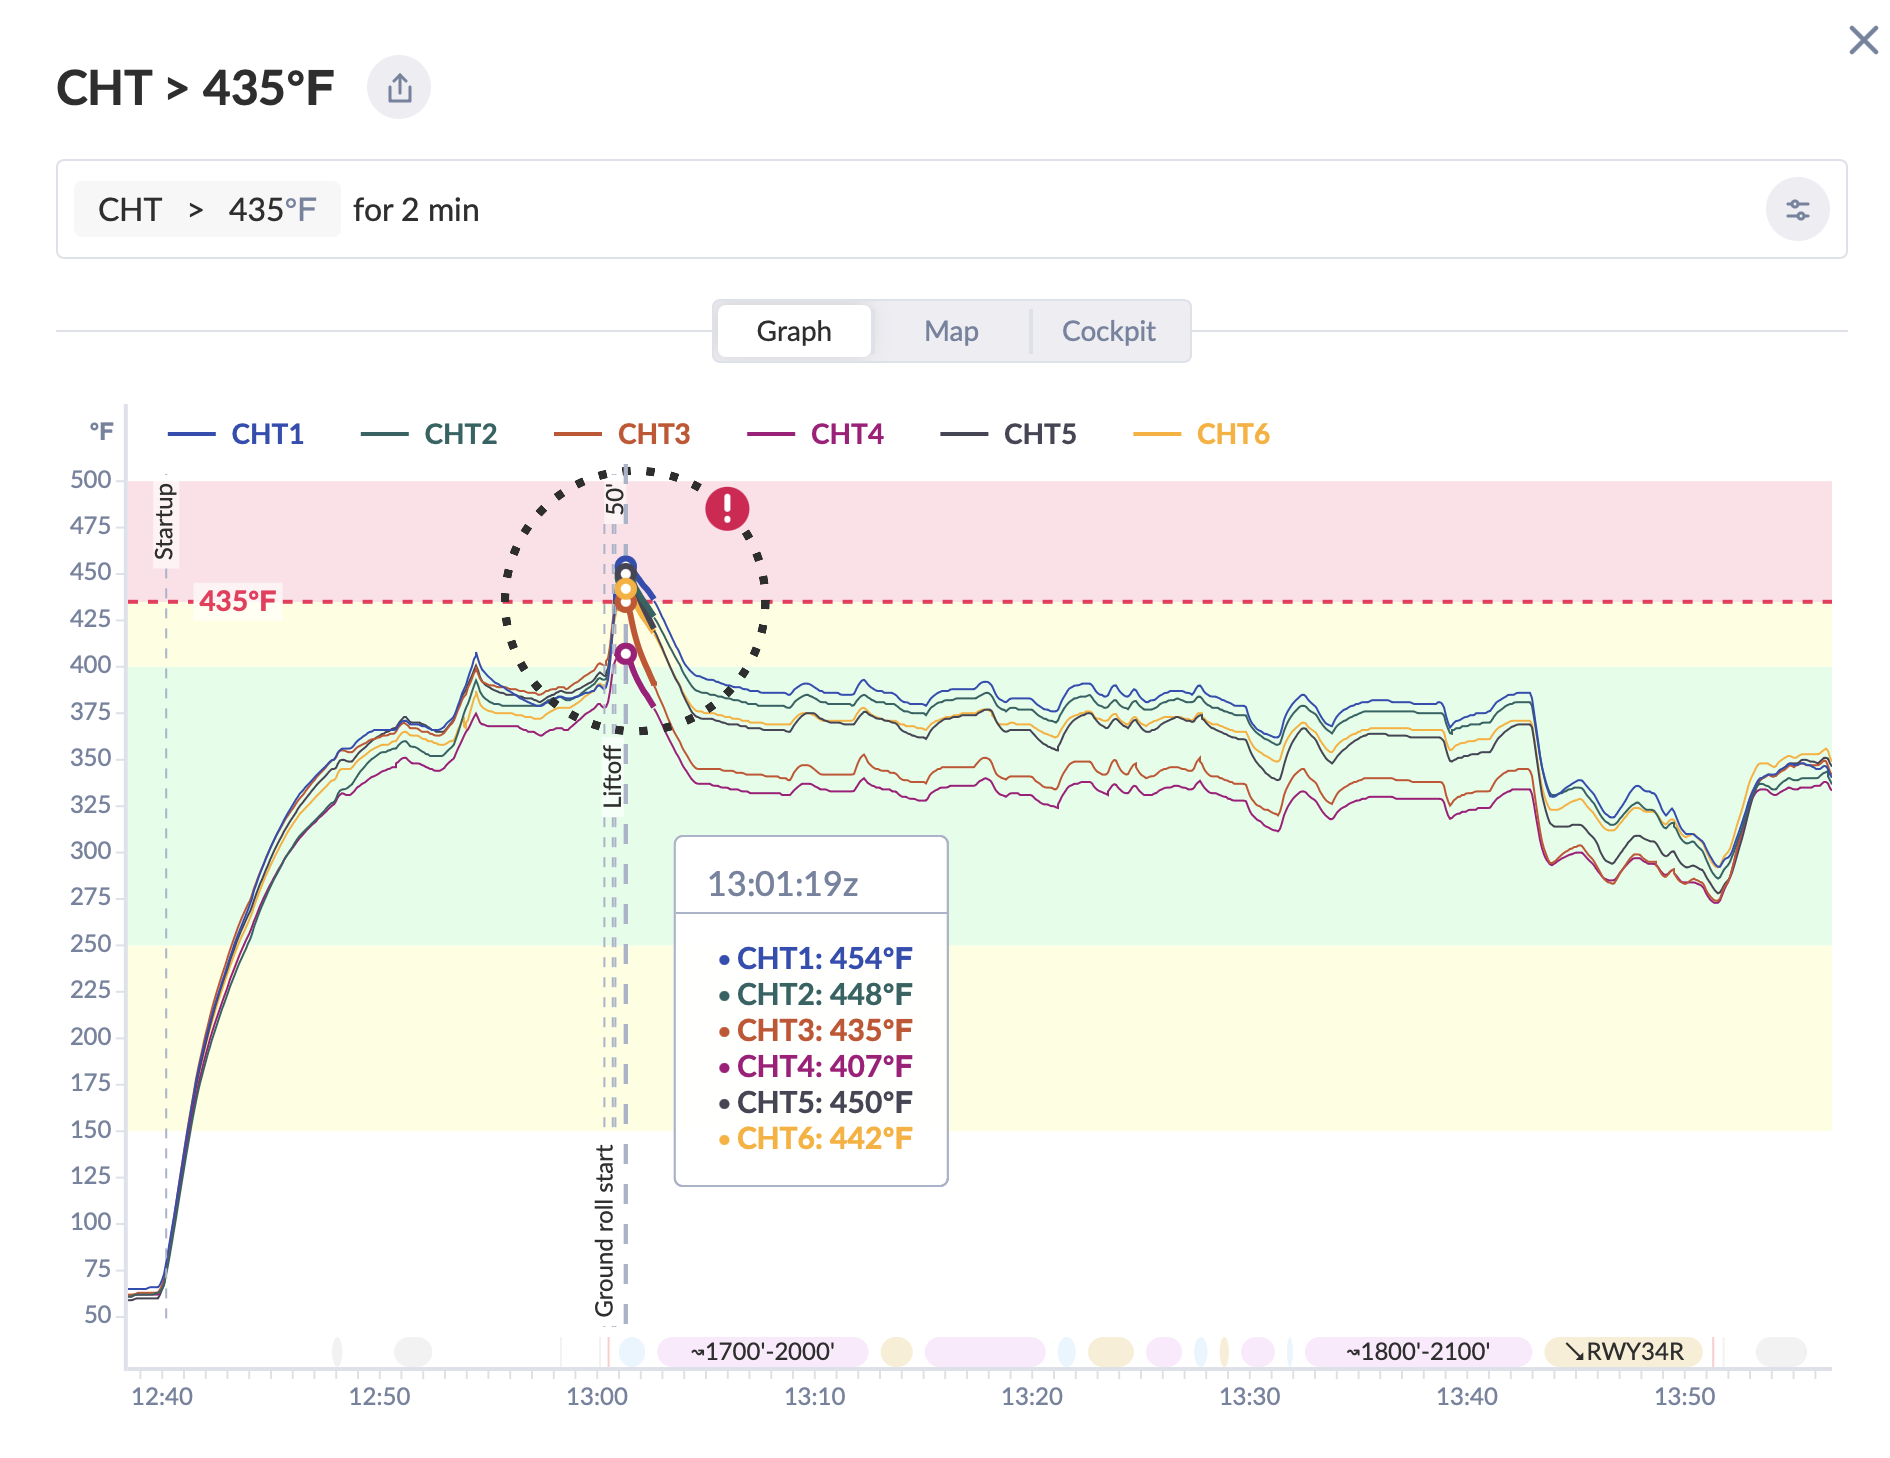
The thing dynamic prop balancing does NOT fix is the takeoff tumble — the PFD #1 attitude going upside down on the takeoff roll, every flight, 1–11 seconds after takeoff power application. That phenomenon was the original reason I started looking at ADAHRS data, and it has persisted unchanged through both the CAN bus rewire and the prop balance. Once two of the three leading environmental suspects (CAN noise, engine vibration) have been ruled out, what’s left is the GSU 25C hardware itself, and that’s now an open Garmin case against Service Bulletin SB 2144. (More on that in a future post.)
The takeaway
If you’ve got an experimental airplane with a fresh engine/prop install and you haven’t done a dynamic balance yet, it is — based on this single data point, take it with appropriate salt — worth the afternoon. The before/after on cabin feel is obvious, the before/after on ADAHRS deviation is measurable, and getting into the Excellent or Perfect band is achievable with patience and trim washers.
Twelve runs. Rough to Perfect.